How to Automate Video Editing: A Practical Workflow
Learn how to automate video editing with a staged workflow: detect cuts, score clips, add captions and review before publishing.
5 min read
November 19, 2026

Learn how to pick, edit, caption and publish podcast clips for social media on YouTube, TikTok, Instagram and Facebook, with platform specs and tracking.
Written by:


You've finished the episode, exported a few promising clips, and watched the view counts rise. But the podcast dashboard barely moves. Meanwhile, someone's corrected the guest's name in the comments, and the captions disappear behind the app's buttons.
Making podcast clips for social media isn't just a matter of finding a lively exchange and cropping it vertically. You need a complete thought, an edit that makes sense without sound, and a way to distinguish casual viewing from genuine interest in the show.
| Platform | Best aspect ratio | Length to aim for | Caption style that works |
|---|---|---|---|
| YouTube Shorts | 9:16 vertical | 30–60 seconds, long enough to land the payoff | Large burned-in captions around the middle third, below faces |
| Instagram Reels | 9:16 vertical | 30–60 seconds | Captions above the bottom controls, clear of interface overlays |
| TikTok | 9:16 vertical | 30–60 seconds | Bold phrase captions, with selective word highlighting |
| Facebook Reels | 9:16 vertical | 30–45 seconds | Centred captions that remain readable without sound |
| 1:1 or 9:16 | 60–90 seconds when the explanation needs it | Restrained captions with the speaker's name on first appearance | |
| X | 16:9 or 1:1 | 30–60 seconds | Captions in the lower half, clear of playback controls |
These durations are editing targets. Actual maximums differ by platform and by route: the app, the desktop uploader and a scheduling tool can each accept something different. Check the allowance where you're publishing, then cut to the target that fits the idea rather than the other way round.
A clip can be someone's first encounter with your show. In a late-2024 survey of people aged 13–24, 26% said they most often discovered podcasts through social media posts, according to Edison Research and SiriusXM Media's Gen Z Audio Report, as reported by Aubrium.
For Shorts, start with a vertical sequence and check whether your source footage survives a close crop. Two-camera recordings handle it; a single wide shot with hands and props often does not, so frame wider and let the caption carry the emphasis. On Reels, leave room for the caption and account controls; the Instagram video format guide is useful when preparing that version.
TikTok tolerates a conversational delivery, but animated captions shouldn't outrun reading speed. For Facebook Reels, try a tighter version that removes pauses and secondary examples before removing information the viewer needs.
On LinkedIn, a square crop preserves gestures and demonstration materials, which matters when the clip is a teaching moment rather than a reaction. On X, a wide frame keeps an exchange, screen share or reaction visible. I'd keep the wide option there, because cropping a screen share to vertical usually destroys the detail that made it worth posting.
Export rule: Choose one primary platform for each clip. Put its aspect ratio and intended duration in the sequence name before creating alternate versions.
One master edit can supply several versions, but it shouldn't dictate all their framing. A crop built for 9:16 will trim the top of a slide deck pulled from a 16:9 source. Check the actual mobile preview, not just the clean editor canvas, and make sure the captions stay legible once the app's controls sit on top of them.
Start with the transcript, but make the final decision from the recording. A sentence can look sharp on the page and sound hesitant, sarcastic, or incomplete when spoken.
Use this selection pass before spending time on graphics:
Find tension. Mark disagreements, admissions, challenged assumptions, and decisions with consequences. You're looking for a reason to keep watching, not just a raised voice.
Locate the concrete detail. A specific mistake, product decision, or customer objection gives the exchange substance. If a speaker cites a number, verify it before using it as the headline.
Remove dependence on earlier context. Listen for pronouns and references whose meaning sits outside the selection. If the opening refers to an earlier explanation, move the start point back or choose a cleaner passage.
Find the payoff before setting the endpoint. The speaker should answer the question, complete the admission, or resolve the disagreement. Don't cut immediately before the useful part merely to encourage an episode click.
Audition the opening without an introduction. Start playback at the proposed in-point and ask whether an unfamiliar viewer knows what's at stake. Remove greetings and throat-clearing, but preserve any qualification that changes the claim.
Keep one idea. A second topic needs its own clip. Trim side roads before speeding up delivery or squeezing captions onto the screen.
Say a host admits that a product launch failed because the team never tested the checkout process. That's usable when the admission establishes the problem and the excerpt includes what the team changed afterward.
A guest correcting a common myth can also work, provided viewers hear both the mistaken belief and the correction. Starting with the correction alone may leave them unsure what the guest is disputing.

For a first batch, shortlist five candidates and keep the strongest three. That's a workload recommendation, not an expected yield from every episode. If only one passage survives the context check, publish that passage rather than manufacturing weaker clips.
Captions are part of the explanation, not decoration. Inside Audio Marketing reports that 48% of clip viewers watch while scrolling social media and 47% while waiting or otherwise filling idle time, so your edit needs to survive distracted viewing as well as deliberate watching (Inside Audio Marketing).
Follow the active speaker. Set the vertical crop around the person speaking, then keyframe it when they lean or turn. Don't let automatic reframing chase every hand movement; use a stable composition until the face needs repositioning.
State the topic immediately. Add a short opening line that names the question or problem. It should clarify the exchange, not exaggerate it or compete with the subtitles for attention.
Generate captions, then proofread against audio. Check proper nouns, company names, numbers, negations, and technical terms manually. Listen again wherever an accent, overlapping speech, or microphone noise makes the transcription uncertain; the guide to adding captions can help with the production workflow.
Identify interview speakers. Add a name on first appearance and keep the styling consistent. When someone speaks off-camera, use a speaker label so the viewer doesn't assign the statement to the visible person.
Make text readable rather than busy. Use high contrast, short phrase groups, and no more than two caption lines as a working layout rule. Break at natural language boundaries, and move text away from mouths, demonstrations, and platform controls.
Run a mute test. Watch the exported file on your phone with the sound off. Check whether you can identify the speaker, understand the opening claim, and follow the conclusion without guessing at tone.
A wrong name is an accuracy problem, not a cosmetic flaw. So is dropping a small word that reverses the meaning of a sentence. Correct those before adjusting highlight colours.
If the spoken sentence is cautious, the on-screen headline must be cautious too.
Keep the show name readable and the route to the episode straightforward. Don't cover the final explanation with an oversized promotional card; let the viewer finish understanding before asking for another action.
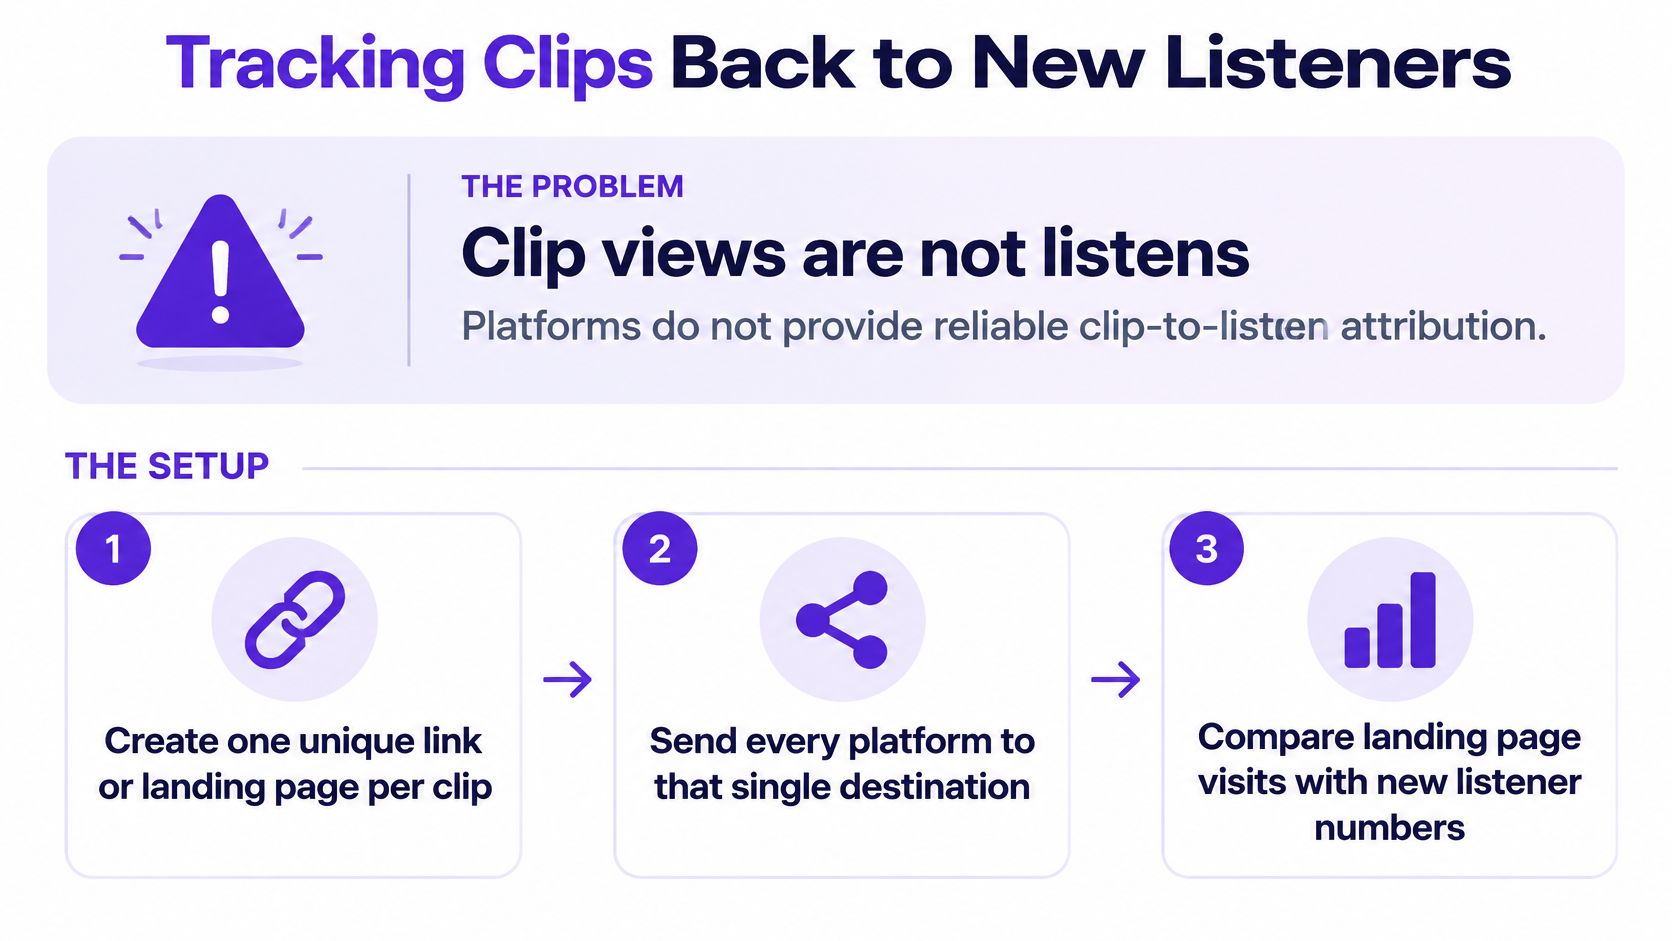
The tracking setup needs the same deliberate preparation as the edit:
Before approval, check the rendered captions, not only the editable transcript. Line breaks, crop changes, and interface overlays can turn accurate text into an unreadable export.
Clip views are not listens. Major platforms don't provide reliable end-to-end clip-to-listen attribution, so a fixed claim about how many viewers become listeners goes beyond what the reporting can establish, as Inside Radio's coverage of podcast discovery explains.
Give each clip a distinct landing-page URL or identifiable link. Use episode-specific UTM parameters, with separate source and content values for each platform version. Test the destination on mobile and record outbound podcast-app clicks, email signups, and any episode-start events your player exposes.
| Metric | What it tells you | How to read it |
|---|---|---|
| 3-second view rate | Whether the opening attracts attention | Compare within the same platform and metric definition, preferably within an episode |
| Completion rate | Whether viewers reach the end | Compare similar durations so length doesn't distort the judgement |
| Profile visits | Interest beyond the individual excerpt | Review alongside posting activity; visits aren't necessarily caused by one clip |
| Unique link clicks | Direct click-through toward the episode | The cleanest available click signal, not proof of listening |
| Downstream listens at 7, 30 and 90 days | Whether listening changes after distribution | Use these as reporting windows; don't assign every increase to clips |
A person who sees a clip and later searches the show represents assisted discovery. Your tagged link won't capture that journey. Podcast-host downloads and listener estimates also aren't interchangeable with confirmed new people, so retain the dashboard's original metric names.
The distinction between passive exposure and meaningful action also matters outside podcasting. SCHelper's resource on engagement metrics for independent artists offers a useful adjacent framework for thinking beyond headline reach.
In the Podcast Atlas survey, 81% said clips lead them to a specific episode at least sometimes, while 30% said often or always; separately, 33% said clips often or always turn them into regular listeners, according to Sounds Profitable. Those are self-reported behaviours, not measured conversion rates for your posts.
Roughly one-third is therefore directional context for high-intent behaviour, not a target percentage to apply to your view count. Your own tagged journeys provide the more useful operational evidence.
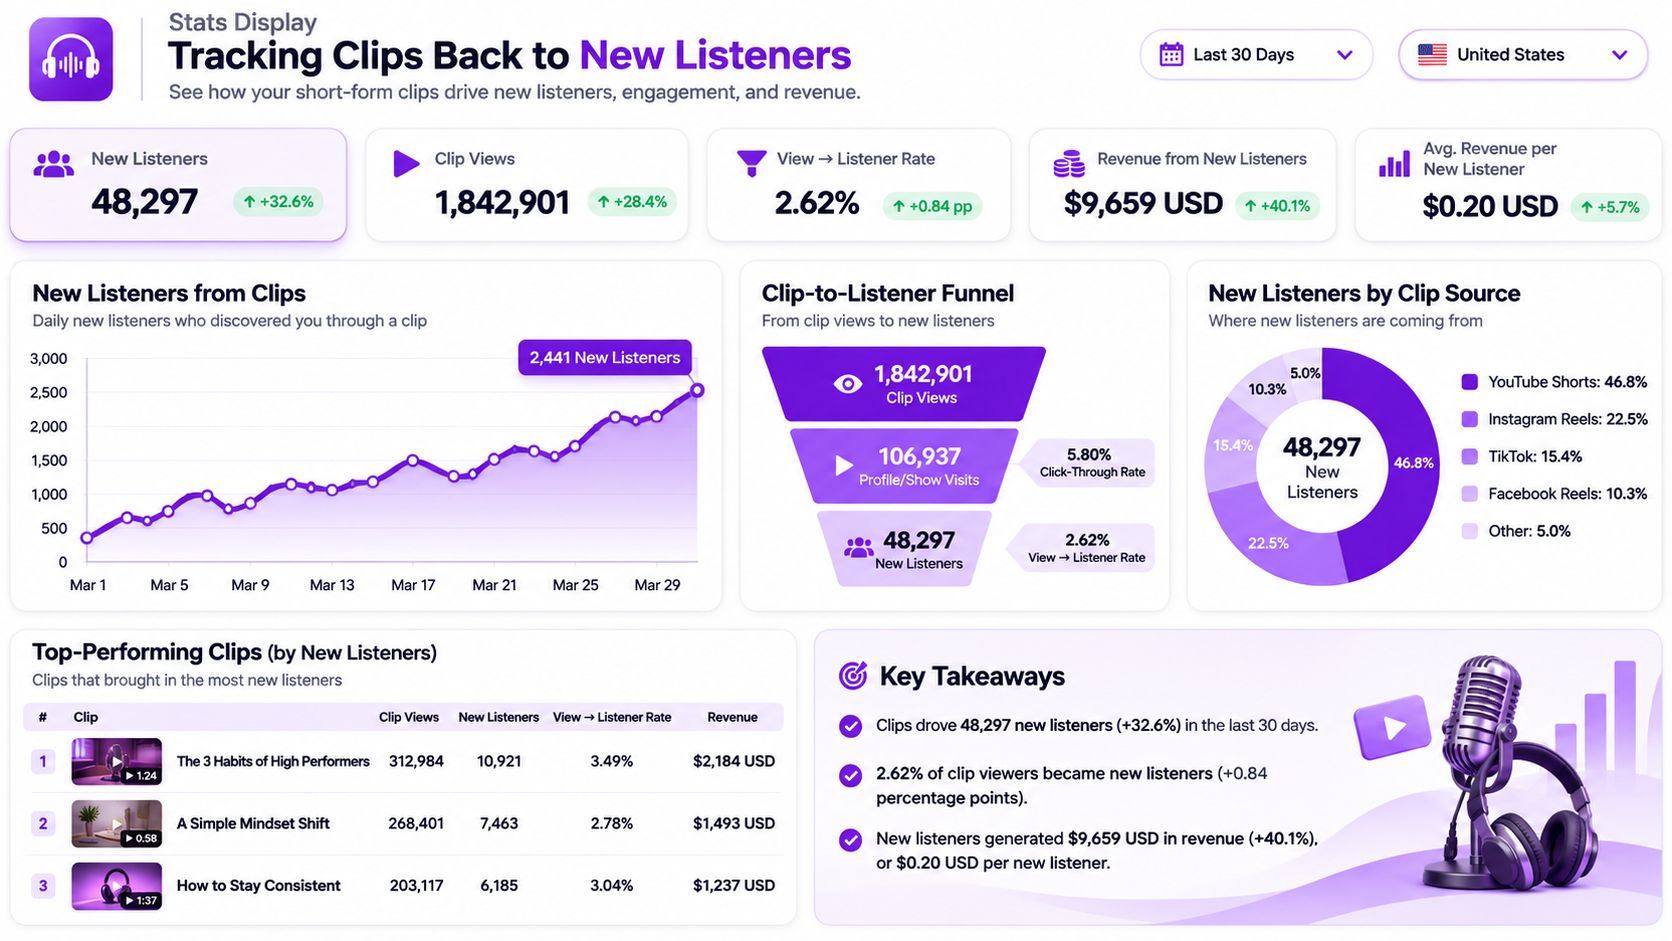
For a broader podcast audience growth workflow, connect clip reporting with episode retention and returning listeners. At your monthly review, keep the formats producing qualified actions rather than automatically backing the biggest view count.
When a clip gets views but no apparent listening response, inspect the viewer's next step before blaming the platform. The excerpt may withhold the answer, omit the show's identity, or send people to a profile with no obvious episode destination.
Use the following review periods as testing schedules, not promises of improvement. Early retention changes can be inspected sooner; listener behaviour needs a longer observation window.
| Symptom | Likely cause | Fix |
|---|---|---|
| Views but no listens | The clip teases an answer or never names the show | Re-cut the ending to deliver the payoff and identify the show. Review downstream actions over a 30-day test |
| Drop-off in the first three seconds | A logo, slow introduction, or throat-clearing precedes the claim | Re-cut to begin on the strongest complete line. Inspect opening retention after 7 days |
| Low completion on TikTok | The excerpt continues after its idea is resolved | Re-cut to a recommended 30–45-second test version, if the thought fits. Inspect retention after 7 days |
| Captions corrected in comments | Names, numbers, or terminology weren't verified | Edit native captions if available; burned-in errors require a corrected export. Check feedback during the next 7 days |
| Speaker cut off | A fixed crop doesn't follow movement | Reframe with keyframes and re-export. Check playback immediately, then review the replacement after 7 days |
| Guest objection in comments | A qualifier or essential setup was removed | Pause distribution and restore context through a re-cut. Use a caption correction only when it genuinely resolves the meaning; assess the revised batch over 30 days |
If the opening is weak, don't simultaneously change the topic, crop, caption style, and destination. You'll lose the ability to tell which adjustment helped.
For guest objections, accuracy takes priority over testing. Contact the guest, establish what the excerpt misrepresents, and remove the misleading version rather than leaving it live while you compare results.
Repair priority: Fix misleading meaning first, unreadable presentation second, and weak performance third.
Pull the weakest clips from your last month of posts and assign each a specific fault. Repair the ones with a defensible underlying idea; retire those that only work when viewers already know the episode.
Keep the first batch small enough to finish, publish, and evaluate. A folder full of half-edited excerpts won't tell you which topic attracts a listener or which destination creates unnecessary friction.
Use this as a practical batch plan:
Choose one recent episode. Shortlist five candidate moments, then retain three that pass the context and payoff checks. Give each a working title that describes its actual subject rather than its hoped-for reaction.
Prepare two platform versions per moment. That gives you six finished versions in this example. Adjust framing, text placement, and pacing deliberately instead of exporting the identical file under different names.
Approve the captions and muted playback. Keep a simple approval field in your tracking sheet. A version isn't ready merely because the editor has finished rendering it.
Prepare the destination before scheduling. Assign the clip identifier and platform parameters, then click through the published route yourself. Record which episode and action each version should lead toward.
Book the reviews. Put an early review after 7 days and a listener-conversion review after 30 days into your calendar as working checkpoints. Keep the longer follow-up open for delayed responses.
At Taja AI, we create shorts, clips with captions, thumbnails, and platform-ready posts from a long-form video, then auto-schedule them to your platforms. We're optimized for content including interviews, podcasts, and tutorials, so you can begin with one upload while retaining the responsibility to review wording and context.
For the surrounding handoffs, Approved Lux Personal Assistant's steps to automate content admin can help you organize approvals, files, and scheduling tasks. Automate repeatable administration, not the decision about whether a guest's meaning survived the edit.
Six tracked versions make a more useful first experiment than a large unmeasured backlog. Publish your batch this week and set the monthly review date before you schedule the first post.
Taja AI turns long-form recordings into captioned clips, thumbnails, and platform-ready posts, with scheduling across your social channels. Visit Taja AI to prepare your first podcast clip batch, then review each cut for accuracy, muted comprehension, and a clear route to the full episode.


We are blessed to work with leading brands & Companies


We try to make easy and simple for every professionals. Get 30 days free trial - No credit card required.


© 2025 Taja AI. All rights reserved.