.jpeg)

TikTok Content Strategy: A Step-by-Step Playbook
Build a TikTok content strategy in seven steps: set goals, pick pillars, batch production, repurpose videos, post consistently and measure what works.
5 min read
October 25, 2026

Master keyframe premiere pro techniques in 2026. Learn motion, scale, opacity, audio keyframes, easing & shortcuts for smooth animations.
Written by:


You've probably got a clip on your timeline right now that feels flat. The talking head is fine. The cut is clean enough. But the frame just sits there, and the moment that should feel intentional lands with all the energy of a slideshow.
That's usually where people start searching for keyframe Premiere Pro tutorials. They want movement, polish, and a more professional feel without turning into a full-time motion designer. Fair goal.
The problem is that most guides stop at button-clicking. They'll show you how to add a keyframe, maybe how to ease it, and then leave you alone with a timeline full of tiny diamonds and a growing sense that every small animation is taking too long. Knowing how to keyframe matters. Knowing when it's worth keyframing matters even more.
A keyframe is a waypoint for change over time. You tell Premiere Pro where a property starts, where it ends, and the software fills in the motion between those points.
Adobe documents this clearly in its guide to adding keyframes in Premiere Pro. You can add keyframes in either the Timeline or the Effect Controls panel, and any animated change needs at least two keyframes, one at the beginning and one at the end, because Premiere Pro interpolates the values between them.
That's the whole concept. If Scale starts at one value and ends at another, Premiere creates the zoom. If Opacity starts high and ends low, Premiere creates the fade. If audio volume changes between two points, Premiere creates the level ramp.
If you've ever set directions in a maps app, you already understand the logic. The app needs a starting point and a destination. It then calculates the route between them.
Keyframes work the same way.
Set two pins, and Premiere handles the travel in between.
Practical rule: If a property needs to change over time, keyframes are usually the first tool to check.
This is why keyframes sit under so many everyday editing moves. A subtle push-in on a talking head. A logo fading on. A lower-third sliding into place. Music dipping under dialogue. None of that requires frame-by-frame manual animation.
Adobe's workflow also reflects how standardized this process is. You typically enable animation with the Toggle Animation icon, move the playhead where you want the change, and use Add/Remove Keyframe in the same controls panel. That consistency is one reason keyframing has stayed central to Premiere Pro workflows for years.
Here's the useful mindset shift. Keyframes aren't a flashy bonus feature. They're the basic language of controlled motion inside Premiere Pro. Once you get that, the interface stops feeling cryptic and starts feeling predictable.
Most frustration comes from one of three mistakes:
| Mistake | What happens |
|---|---|
| Using only one keyframe | Nothing changes over time |
| Keyframing the wrong property | The clip moves or fades in a way you didn't intend |
| Ignoring timing | The motion technically works, but it feels awkward |
The win is that you don't need advanced animation theory to fix any of that. You need a clean start point, a clean end point, and a reason for the motion to exist.
The fastest way to make keyframes click is to build one useful move. A simple zoom-in does the job because it teaches timing, Scale, and often Position all at once.
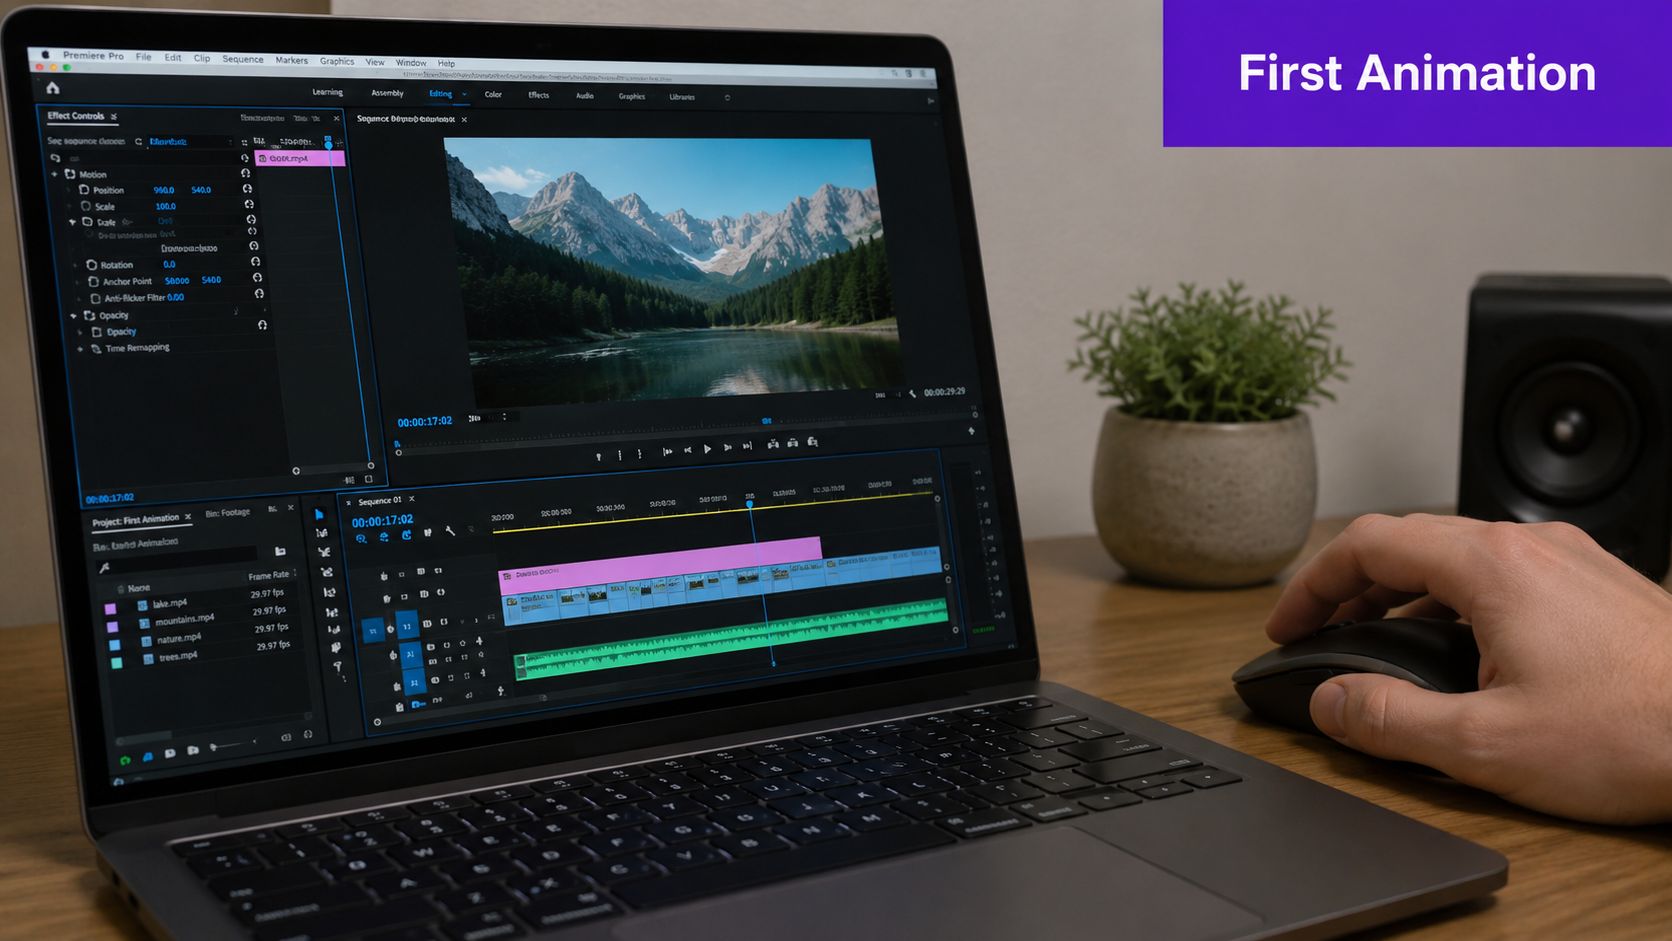
Pick a clip where the subject stays relatively stable in frame. Interviews, product demos, screen recordings, and real estate walkthroughs all work well. If the original shot is already shaky, the zoom will often feel worse instead of better.
Click the clip in your timeline. Open Effect Controls. Under Motion, you'll see Position, Scale, and Rotation. Slightly lower in the panel, you'll also see Opacity.
To animate Scale, click the stopwatch icon next to it. That turns animation on and creates your first keyframe at the current playhead position. Leave the opening value where it is if you want the shot to begin naturally.
Move the playhead farther into the clip. Then increase Scale. Premiere Pro automatically creates the second keyframe because the value changed at a new point in time.
If the zoom pushes your subject off-center, adjust Position at that same ending point. Premiere will create Position keyframes too, so the frame can drift gently while it zooms.
A practical pattern looks like this:
If you want a more detailed walkthrough for this exact move, this guide on how to zoom on a video pairs well with the Premiere workflow.
The little diamond icons matter. A filled diamond usually means the playhead is sitting directly on a keyframe. An empty or inactive-looking state usually means you're between keyframes.
That sounds minor, but it saves a lot of accidental edits. Many beginners think they're adjusting a keyframe when they're creating a new one in the middle.
If your animation suddenly feels uneven, check whether you added an unintended middle keyframe.
Open a short clip and repeat this sequence a few times until it feels automatic:
That's the foundation of keyframe Premiere Pro work. Once this sequence feels normal, other properties stop feeling mysterious.
Here's a visual walkthrough if you prefer watching the clicks before doing them yourself:
Don't try to animate everything in your first pass. Busy creators often waste time adding motion just because they can. A zoom should support emphasis, pacing, or focus. If it doesn't improve the shot, leave it alone.
A restrained zoom that lands cleanly will look more polished than a dramatic one that fights the footage.
Most bad keyframing isn't caused by bad placement. It's caused by default interpolation.
Premiere Pro often starts with linear motion. That means the element moves at a constant rate from one keyframe to the next. Technically correct, visually stiff.
For smoother motion, editors commonly change the first keyframe to Easy Out and the second to Easy In, then fine-tune the feel by dragging the keyframes closer together or farther apart. That shift from linear to eased motion is the main difference between abrupt animation and smoother movement, as shown in this keyframe interpolation tutorial.
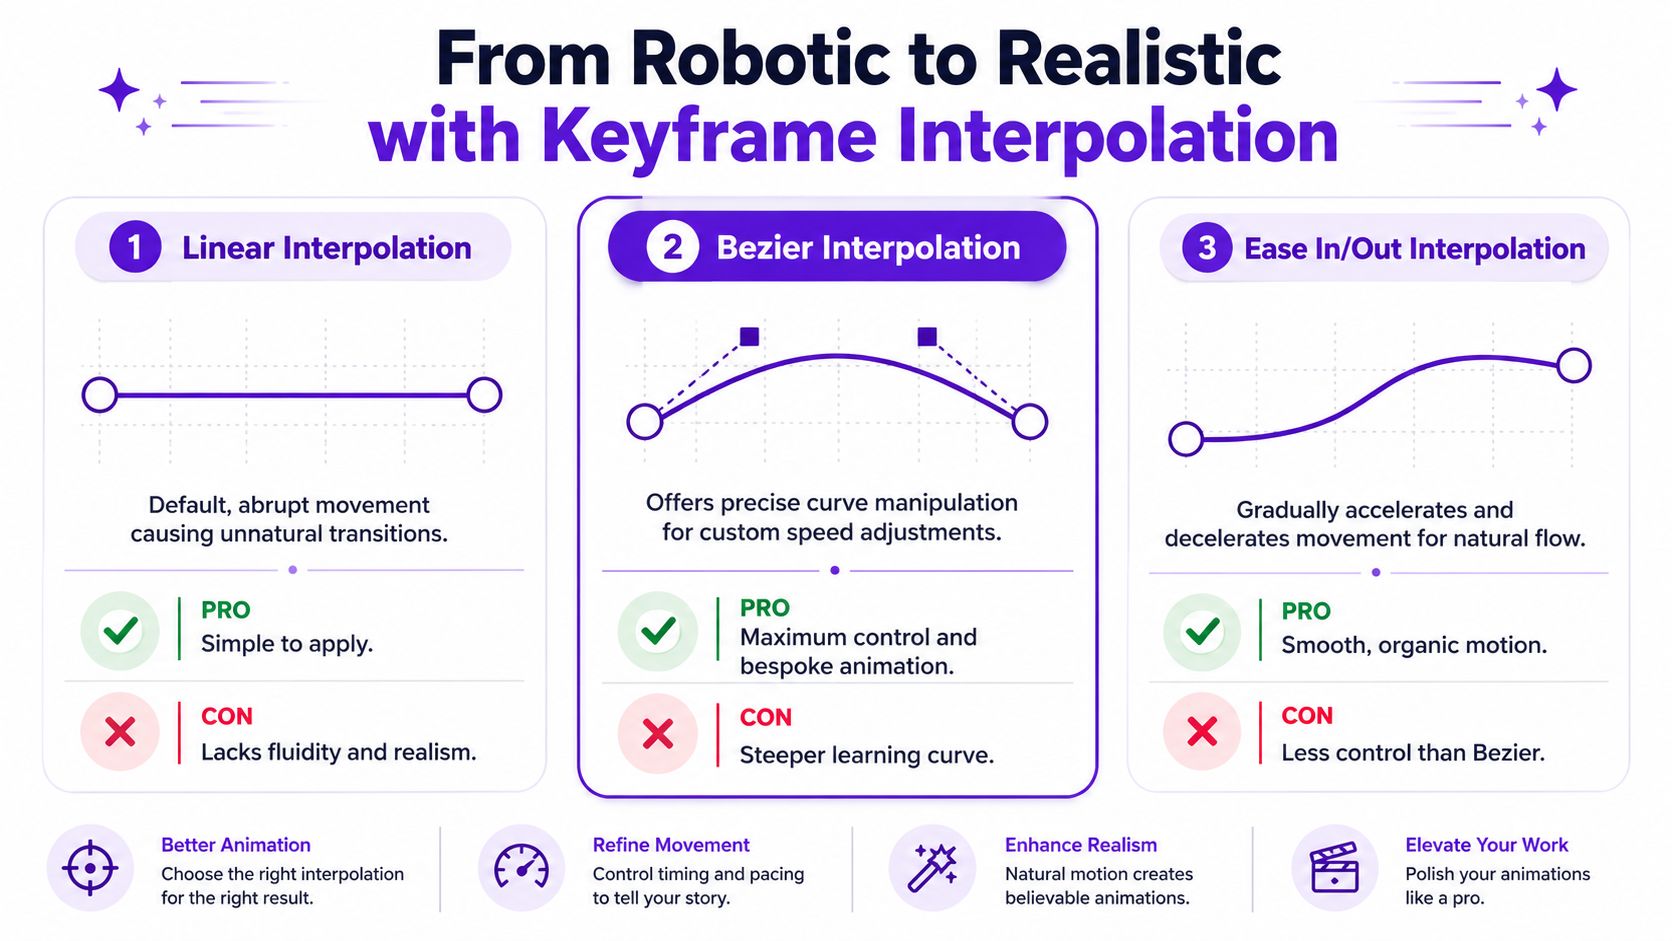
Right-click your first keyframe and choose Ease Out. Right-click your second keyframe and choose Ease In.
That simple change does a lot. The movement starts more gently, accelerates through the middle, then settles into the end instead of slamming into it. For talking-head zooms, title slides, and picture-in-picture moves, this is usually the first adjustment that makes the animation feel deliberate.
A lot of editors hear these terms before they know when to use them. Here's the practical version:
| Interpolation | Best use | Usual downside |
|---|---|---|
| Linear | Mechanical or deliberately rigid motion | Looks abrupt in most edits |
| Ease In / Ease Out | Fast polish on common moves | Less custom control |
| Bezier | Fine-tuned custom speed changes | Takes more time to shape |
Linear isn't wrong. It's just unforgiving. If you're animating a UI pointer or an intentionally rigid movement, it can work. For most footage-based edits, it feels robotic.
Bezier gives you more control over acceleration and deceleration. That's useful when motion needs personality, especially for text, logos, or layered animation. But it's also where creators can lose time chasing perfection nobody will notice.
If you work on quick-turn content, start with easing. Reach for Bezier only when the standard ease still feels off.
Once you apply easing, look at the spacing between your keyframes. Closer keyframes create faster motion. Wider spacing creates slower motion.
Many individuals often over-edit. They keep changing values when the issue is timing. If the zoom feels too aggressive, you may not need a smaller Scale change. You may just need the same move spread across more time.
Smooth animation usually comes from two things. Better easing and better spacing.
For a related workflow on making text and motion feel more polished on modern video, this guide to text in video software is useful when your animations include on-screen graphics.
The Graph Editor is where Premiere stops being basic and starts being precise. You don't need it for every edit, but it helps when an animation feels almost right and you can't tell why.
In plain terms, the graph lets you shape speed visually instead of guessing with clicks. You can make a move linger at the start, accelerate harder in the middle, or settle more softly at the end.
Don't make this your default for every social clip. Use it when:
That's the line between movement and motion design. Most creators only need to cross it occasionally.
The first time keyframes become useful is when you stop treating them as a zoom tool. Their real value is that the same logic applies almost everywhere in Premiere Pro.
A common example is a blur transition. Say you want a clip to drift into a dreamy, slightly abstract moment before snapping back to clarity. Instead of dropping in a flashy transition pack, you can apply a blur effect to the clip and animate the amount over time.
Drop a blur effect onto the clip. In Effect Controls, enable animation for the blur amount using the stopwatch. Start with the image clean. Move forward a bit and raise the blur. Then decide whether you want it to stay blurred briefly or return to sharpness.
This works well when you want to suggest a memory, a reveal, or a shift in focus without making the edit scream for attention.
A good test is whether the viewer notices the story beat more than the effect. If they're thinking about the blur itself, you probably pushed it too far.
If you want more ideas for effect-driven edits that still feel usable in day-to-day projects, this overview of video editing with effects is a practical next read.
Now for the less glamorous use case. Audio.
Imagine you've got background music under a spoken section. The music feels good in the intro, but the second the person starts talking, the words get muddy. Automatic tools can help, but manual keyframes still give you the cleanest control when timing matters.
Open the audio clip in the timeline. Add volume keyframes around the moment the dialogue begins. Pull the music down during the speaking section. Then add another set of keyframes and bring it back up after the line ends.
That gives you a smooth dip instead of an abrupt volume cut.
Use four points:
This is simple, but it solves one of the most common quality problems in small-business content. Viewers will forgive basic visuals long before they forgive muddy dialogue.
Clear speech beats fancy motion every time.
A lot of editors miss this. Keyframes are often most valuable when they're almost invisible.
They help you:
| Task | Property being animated |
|---|---|
| Fade a clip in or out | Opacity |
| Dip music under voice | Volume |
| Build a soft focus moment | Effect amount |
| Reframe attention inside a static shot | Scale and Position |
That's why learning keyframe Premiere Pro basics pays off so quickly. You're not learning one trick. You're learning a control system that shows up across video and audio work.
Knowing how to keyframe is one thing. Doing it quickly enough to keep momentum is another.
When you're editing under deadline, the goal isn't elegant theory. The goal is getting clean, repeatable motion without constantly reopening panels, hunting for tiny diamonds, or fixing preventable mistakes.
A few habits make a big difference:
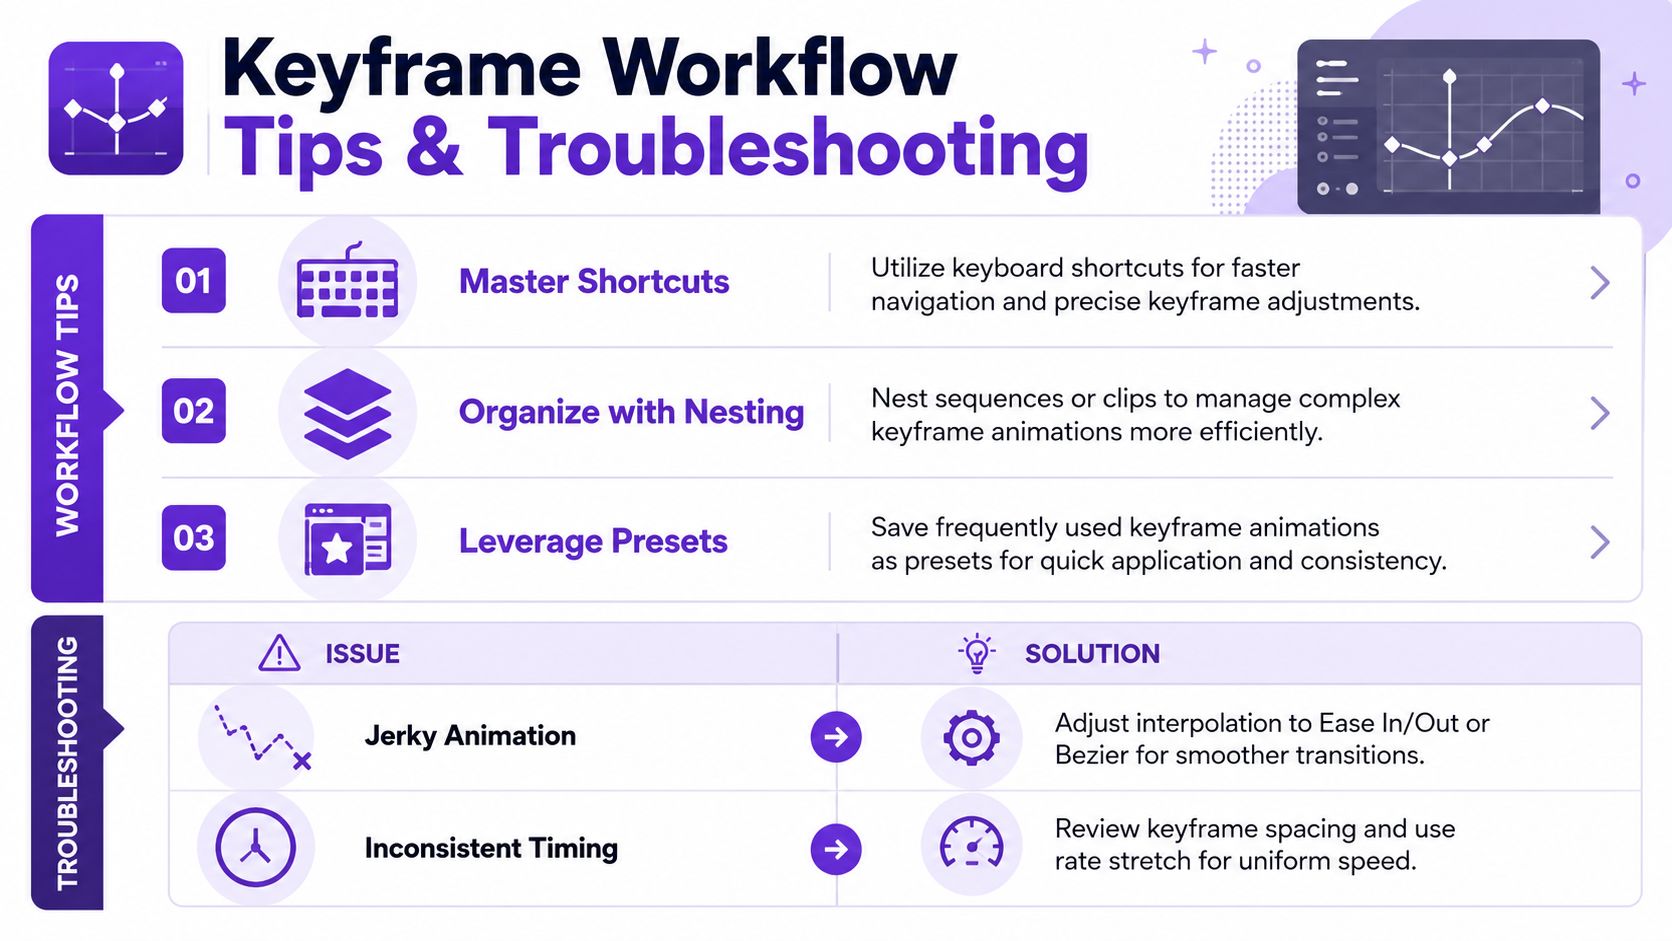
The big workflow shift is this. If you've made the same animation more than a few times, it probably deserves to become a preset.
Usually, animation wasn't enabled for that property, or the two keyframes have identical values. Check the stopwatch first. Then check whether the start and end values are meaningfully different.
If both Scale keyframes are the same, there's no visible change.
This is usually a Position or Scale issue. The clip may have been pushed too far, scaled too aggressively, or animated from the wrong playhead location.
Reset the property mentally by checking the first and last keyframe values. In many cases, deleting the accidental keyframe is faster than trying to rescue it.
At that point, the problem is often one of these:
Fix them in that order. Don't jump straight into complex curve editing if a simple Ease In and Ease Out adjustment solves it.
Most “broken” animation is just rushed timing.
| Problem | Most likely cause | Fastest fix |
|---|---|---|
| No visible animation | Same values or animation off | Enable stopwatch and change end value |
| Motion feels harsh | Linear interpolation | Apply easing |
| Subject drifts off-center | Scale changed without Position correction | Reframe at the ending keyframe |
| Edit feels overworked | Too many animated properties | Strip it back to one clear move |
The editors who get fast at this aren't clicking more. They're making fewer unnecessary decisions.
Here's the part most Premiere Pro tutorials skip. Sometimes keyframes are the right tool. Sometimes they're a trap.
Adobe's documentation on interpolation explains how keyframing works, but the practical gap for many creators is deciding when not to use it. That gap matters because keyframe-heavy editing becomes slow at scale, especially when you're repurposing content across many short clips instead of building one handcrafted piece. Adobe's own material remains focused on manual animation mechanics, which leaves room for a more practical decision framework around presets, templates, and AI-assisted repurposing, as noted in its guide to controlling effect changes using keyframe interpolation.
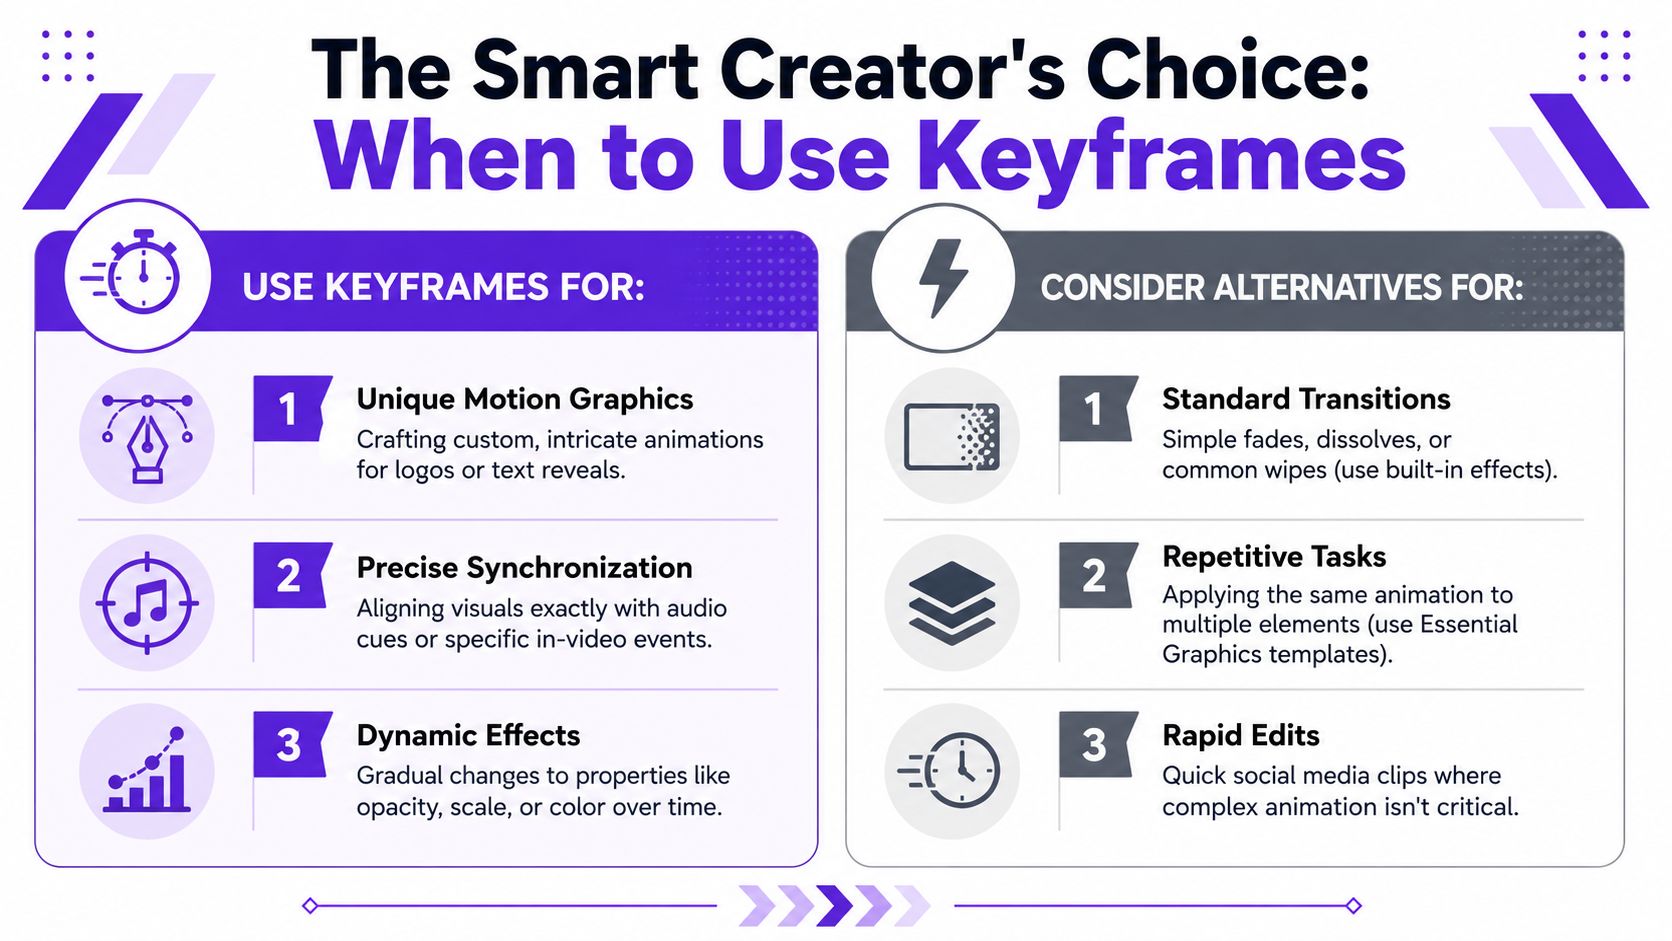
Manual keyframing is worth it when the movement needs judgment.
That includes:
In those cases, hand-tuning the timing is part of the craft. A template might get close, but close isn't always enough.
In this situation, a lot of small teams burn hours they don't have.
If you're making batches of social clips from a podcast, webinar, sermon, interview, or training video, manually adjusting the same motion on every cutdown is rarely a smart use of time. That kind of work usually belongs to:
| Task type | Better option |
|---|---|
| Repeating branded animations | Presets |
| Standard lower-thirds and callouts | Motion Graphics Templates |
| High-volume short-form repurposing | AI-assisted workflows |
| Fast edits where motion is secondary | Built-in transitions or simpler cuts |
There's a difference between editing and manufacturing. When the job becomes repeatable, your workflow should become repeatable too.
Ask three questions before you keyframe anything:
If the answer to the first is no, skip it. If the answer to the second is yes, build or use a reusable system. If the answer to the third is no, don't hand-animate it just because Premiere Pro can.
That's the mature way to think about keyframe Premiere Pro work. It's not a badge of seriousness. It's one tool in a broader editing stack.
If you're spending too much time turning long videos into dozens of short assets by hand, Taja AI is built for that bottleneck. It helps creators and small teams turn one long-form video into ready-to-publish shorts, captions, thumbnails, blogs, and platform-specific posts without manually rebuilding every cutdown. For anyone who wants the benefits of polished content without keyframing repetitive social edits one by one, it's a practical way to scale output and protect your editing time.


We are blessed to work with leading brands & Companies


We try to make easy and simple for every professionals. Get 30 days free trial - No credit card required.


© 2025 Taja AI. All rights reserved.