How to Make a Video with YouTube Clips: Steps and Rights
How to make a video with YouTube clips: select clips, stitch them, format for each platform, stay copyright-safe, and repurpose long videos.
5 min read
November 4, 2026

Discover How to Share TikTok to Instagram as a Reel or Story, with export specs, quality settings and fixes for cropped or muted posts.
Written by:


You posted a TikTok this morning, the comments are still coming in, and Instagram is the next place you want it. The Share button is sitting right there. It is also the fastest way to hand Instagram a branded, softer copy of a video you already cut cleanly.
I would pause on two questions before any export. Do you own this clip? Do you need a Reel that can travel, a Story that lasts a day, or a message to one person? Those answers pick the method, and every method trades picture quality for speed.
Pick the route from the job, not from whichever button sits closest to your thumb.
| Method | What Instagram receives | TikTok watermark | Best for |
|---|---|---|---|
| Send the TikTok link in Instagram direct messages | A link preview, not a video post | Not applicable | Sharing one video with a friend |
| Share to Instagram Stories from TikTok | A Story with the video and TikTok branding | Visible | Quick same-day posts |
| Download the TikTok and upload it as a Reel | A recompressed copy | Visible | Fast reposts where quality matters less |
| Export a clean master and upload it as a Reel | The original edit at full quality | None | Reels you want to perform well |
| Recreate the video natively for Instagram | A version built for Instagram | None | Different hooks or formats per platform |

That second audience is large enough to justify the slower route. In 2025, DataReportal reported potential adult reach of 1.67 billion users for Instagram and 1.59 billion for TikTok worldwide. The same file choice applies when you share an Instagram Reel to TikTok.
Practical rule: A Story for a same-day tease, a link for a friend, a clean master for a Reel you want to perform well.
Before you continue, answer both. Do you own the video, and is the goal a Reel, a Story, or a message?
A credit line in the caption does not make someone else's TikTok yours. Neither does a sticker, a border, or leaving their username in the corner. Ownership decides whether you can post at all, and it has to be settled before you choose a sharing method.
Instagram's originality guidance says content created by the same account can still be original even if it was published on TikTok first. The greater risk is uploading another creator's work with only minor edits. Borders, stickers, logos, subtitles, or merely crediting the creator do not constitute meaningful transformation.
| Situation | Post as a Reel? | Why |
|---|---|---|
| Your own TikTok, posted unchanged | Yes | Same account, so the video is original; check music licences |
| Your own TikTok, with new narration or commentary | Yes | Added value strengthens the post |
| Someone else's TikTok, reposted as is | No | Needs the creator's permission |
| Someone else's TikTok with a border, logo or subtitles | No | Minor edits do not make it original |
| Someone else's TikTok, reacted to or taught with | Possibly | Substantial added commentary plus permission for the clip is the safer route |
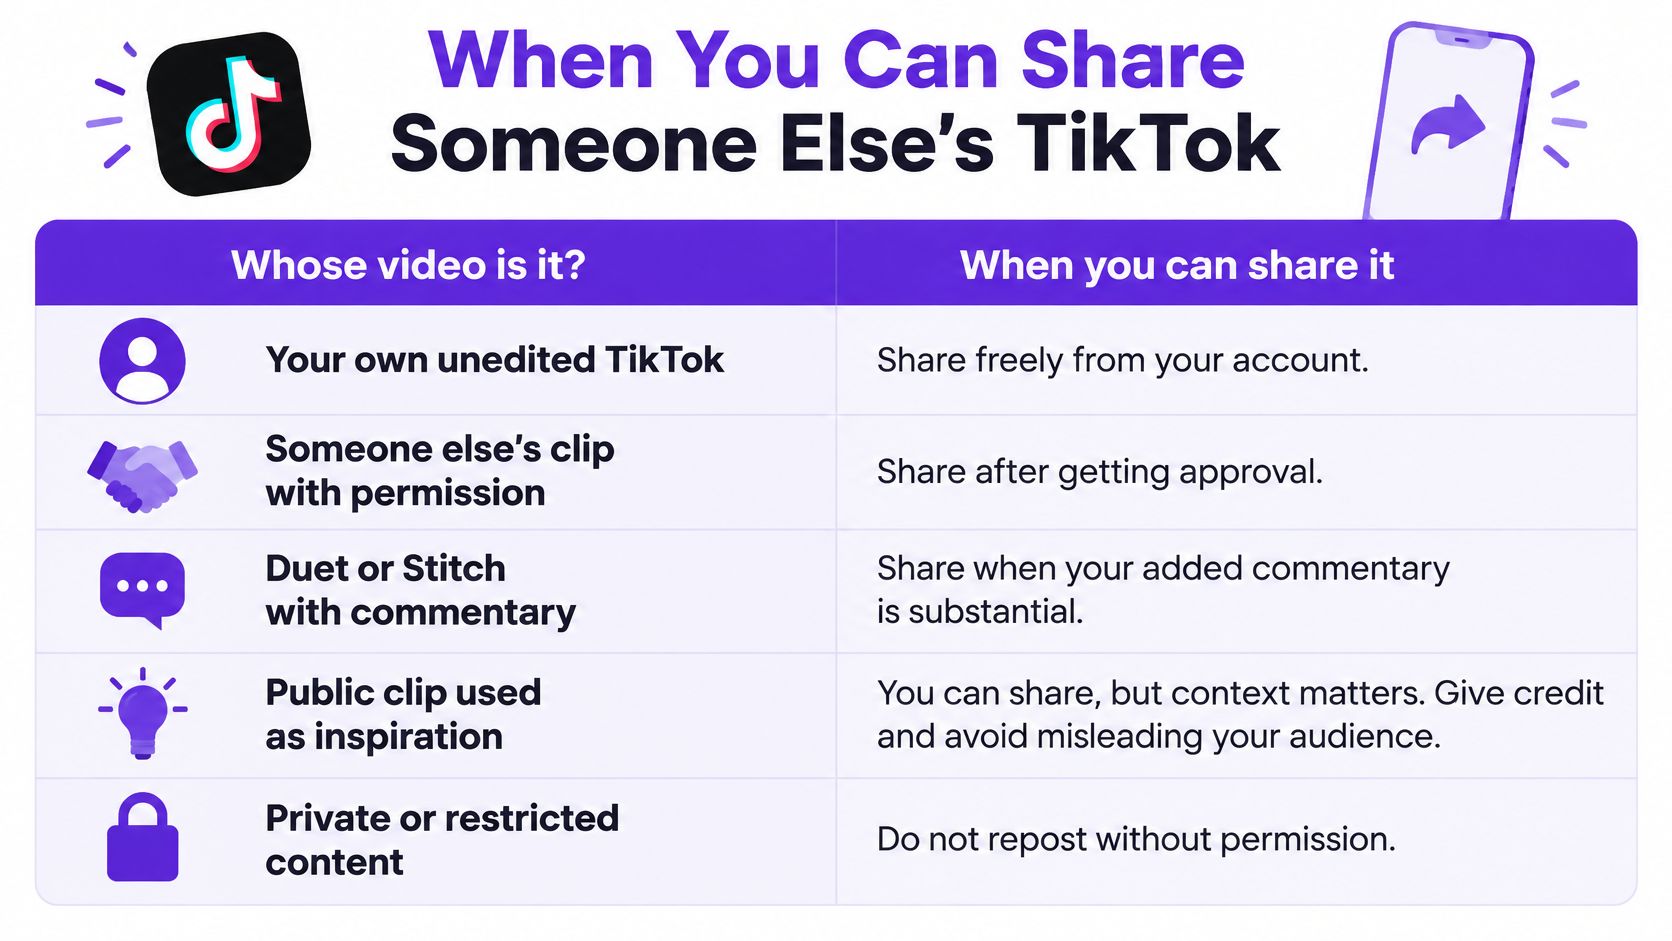
A transformed repost adds narration, reporting, teaching, or commentary the original does not have. Talking over a clip to explain a listing photo, a lesson, or a local service can clear that bar. Dropping the same clip into a new frame, with "credit: @name" underneath, does not.
Real estate agents, educators, podcasters, and local businesses should split the check into four parts: ownership, consent, attribution, and commercial use. A sound that came attached on TikTok needs its own licence review, because permission to use the picture is not permission to use the music in an ad or a lead-gen post.
Giving credit is not a substitute for permission.
Three questions, in order. Did I make it? Do I have permission? Does the Instagram post add something the original lacks? If any answer is no, do not post it as a Reel.
Set the file once, then reuse the preset. These are the values I check before every upload when the goal is a Reel people can watch.
| Setting | Recommended value | Why it matters |
|---|---|---|
| Aspect ratio | 9:16 vertical | Prevents cropping and letterboxing in the Reel feed |
| Resolution | 1080 × 1920 px, 720 px minimum | Keeps text and faces sharp on phone screens |
| Frame rate | At least 30 fps, fixed | Avoids timing drift and conversion artifacts |
| Video codec and container | H.264 in MP4 or MOV | Matches Instagram's recommended upload format |
| Audio | Stereo AAC, 128 kbps or higher | Keeps speech and music clear on playback |
| Length | 3 minutes or less | Longer Reels are not recommended to new audiences |
Instagram's Reel guidance documents a 1080 × 1920 pixel, 9:16 file at at least 30 frames per second, with 720 pixels as the minimum resolution. Keep discovery-focused clips at or below 3 minutes, because Reels longer than 3 minutes will not be recommended to new audiences. Encode with square pixels, progressive scan, and a constant frame rate so the upload is less likely to be rejected or retimed. Meta's Reels specs also list H.264, MP4 or MOV, and a fixed frame rate. Pair that with stereo AAC at 128 kbps or higher so speech stays intelligible after Instagram's own encode. The same ratios are the core of a sensible Instagram video format whether the clip started on TikTok or in your editor.
Watch the exported file on your computer, not only in the phone preview.
A 4:3 or horizontal export, a screen recording, or a username burned into the corner fails this check. The TikTok share button usually produces that branded, recompressed derivative rather than the source file. If several people touch the same cut, share and export production schedules so the approved master is the file that gets uploaded. A file that passes this local check should look the same on any phone.
Work through these with both apps open. Skip TikTok's Share button for this job. It usually sends a logo and a second compress, which is the opposite of what a performing Reel needs.
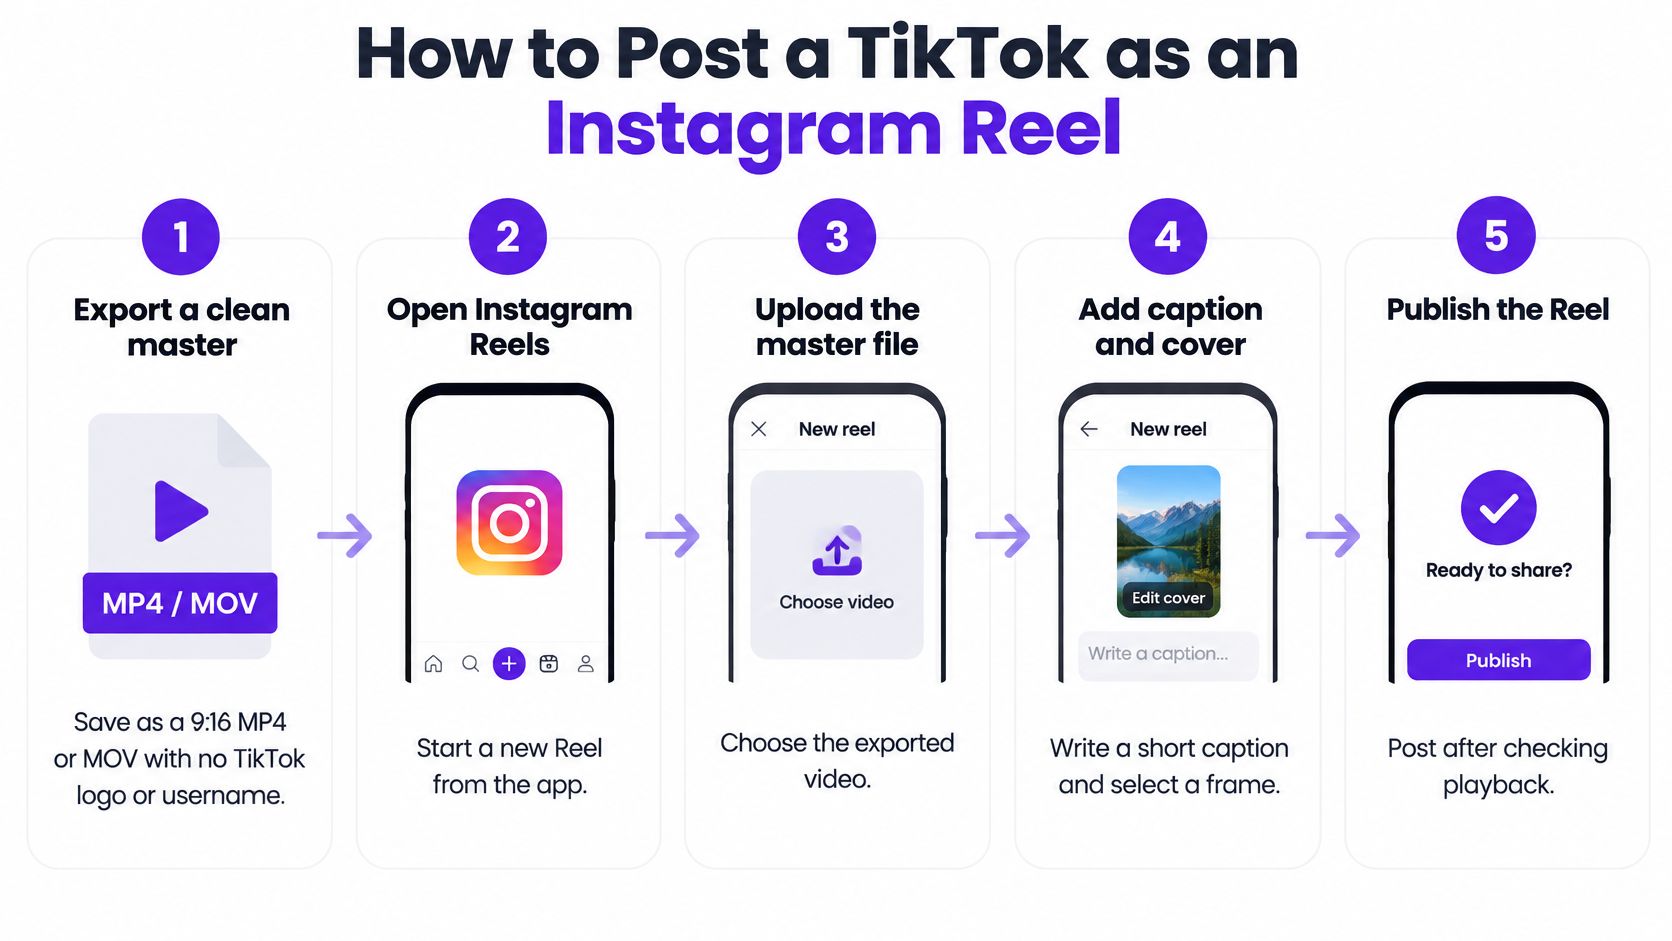
Export the master from the editing app. Save a 9:16 MP4 or MOV with no TikTok logo and no username. You avoid the branded derivative and you keep control of captions and the cover. If the project is gone, re-export from the original camera file you kept. If you only have the posted TikTok, save it with TikTok's own save option, expect a visible watermark and weaker reach, and send that clip as a Story or a link instead of a Reel.
Turn on the high-quality upload. In Instagram, open Profile, then Menu, then Media quality, and enable Upload at highest quality. The upload takes longer because Instagram is not crushing the file as hard on the way in. That single toggle prevents a needless second lossy encode.
Start the Reel from your file, not from the share sheet. Tap the plus icon, choose Reel, and select the master. You are now inside Instagram's composer, so the post is a native Reel rather than a forwarded TikTok.
Set the cover and the trim. Pick a frame where the subject is obvious, or upload a custom cover. Trim a slow open or a leftover end card. The cover is what people see on your grid, and the first second is what they hear.
Write the caption, place, tags, and accessibility text. Keep the spoken audio that was already in the master. Add music from Instagram's library inside the app. TikTok's attached sound often will not transfer, legally or technically, so do not count on it surviving the upload.
Preview, publish, then play it back. Check the preview for cropped edges. After it is live, open the Reel and confirm speech is audible from the first second. A healthy result is a full vertical frame, a readable cover, and sound that is there.
Say you also cut a longer YouTube version of the same idea. The Reel still needs its own cover and its own first line, because Instagram will not borrow YouTube's title card. Once that long video is up, a separate workflow to manage customer responses after YouTube uploads keeps comments from sitting unanswered while you finish the short-form posts. Treat the two platforms as two jobs that share a master file, not as one tap that publishes both.
If the live Reel is cropped, silent, or soft, do not stack filters on top of it. Go back to the master and export again. Filters on a bad file only hide the problem until the next phone you test on.
Use this path when you want a same-day tease or a grid post, not a Reel built for new viewers.
For speed, open the TikTok, tap Share, choose Instagram, and add it to your Story. You are accepting the TikTok branding. That is a fair trade for a post that expires in a day.
For a cleaner Story, skip that share sheet. Open Instagram, tap the plus icon, choose Story, and select the clean master. Add a sticker or a link sticker if the Story needs a next step. Stories display full screen in 9:16, so keep key text in the centre, clear of the reply bar and the profile label.
A Feed post uses that same clean master. Run the local file check, then choose Post in the composer when your app version offers it. Confirm playback with sound, and confirm no TikTok logo or username remains in the frame.
Stories mostly reach people who already follow you. A Reel can reach people who do not. Match the format to that audience. If the weekly queue is more than you can post by hand, a remote social media manager can run the Story and Feed cadence while you keep the master files.
The TikTok caption might read "wait for it #fyp #foryou #viral #cooking". The Instagram version should read "Crispy fried eggs in 90 seconds with no oil splatter. Tap to see the ice-cube trick. #eggs #quickrecipes #breakfastideas".
The second one works because Instagram shows the first line before the more link. The hook has to stand alone. "Wait for it" does not tell anyone what the video is, and #fyp means little once the clip has left TikTok. Dropping those tags keeps the caption short enough to read.
Pick a cover frame where the subject is clear, and put large on-screen text in the middle, away from the bottom where Instagram's buttons sit. Check that cover in a phone-sized preview before you publish. A frame that looks fine on a laptop often hides the face once the Reel chrome appears.
Write alt text that describes the picture, not a repeat of the caption. "Cook cracks an egg into a non-stick pan over medium heat" is useful. "Crispy eggs, link in bio" is not. Use three or four hashtags that name the thing in the video, such as the dish, the service, or the lesson.
The same clip can carry a different first line on each network without a new edit. That is the useful part of learning how to repurpose content: change the words the viewer sees first, and leave the picture alone when the picture is already right.
The complaint I hear most is a Reel with the sides cut off. The file was exported in 4:3 or horizontal, and Instagram filled the vertical slot by slicing the picture. Re-export at 9:16 and 1080 × 1920. Do not try to fix framing with a sticker.
| Symptom | Likely cause | Fix |
|---|---|---|
| Sides of the video are cut off | Exported in 4:3 or a horizontal format | Re-export at 9:16, 1080 × 1920 |
| Reel plays without sound | Missing or unsupported audio track | Re-export with AAC audio, then add licensed music in the app |
| Picture looks soft or blocky | Low-resolution screen capture or repeated compression | Export the master at full resolution and turn on Upload at highest quality |
| Captions sit under the Instagram buttons | Text placed near the bottom of the frame | Move captions up into the middle of the frame |
| Reel gets little reach | Watermark, blur or a muted file | Repost the clean master and check the preview |
| Reel stops reaching new viewers | Longer than 3 minutes | Trim the clip or split it into shorter Reels |
| Cover frame looks random | Automatic frame chosen | Pick a clear frame or upload a custom cover |
Some fixes take a few minutes inside the composer. A random cover, a buried caption, or a slow open can be changed without a new file. Swap the cover, move the on-screen text up, or trim the head and tail, then publish again.
Other fixes require a new export. Aspect ratio, resolution, a missing audio track, and a burned-in watermark are embedded in the file. Adding licensed music in the app fixes a silent or unsupported track only after the master contains AAC audio. A clip longer than 3 minutes should be trimmed or split into shorter Reels if new viewers are the goal.
If a clean repost still gets little attention, stop staring at likes alone. Compare views, saves, and shares with your usual posts. A Reel people finish and send is a different result from a Reel they tap past, and that comparison tells you whether the next change belongs in the hook or in the file.
Choose the Story route for a same-day tease, a link when one friend asked, or the clean master when the Reel should perform. If you do not own the clip and you do not have permission, none of those routes is available.

Before you tap publish, the export should already have passed a local playback check, and the cover and first caption line should be final. After it is live, open the Reel and confirm sound, framing, and the cover you chose. Write down the route plus views, saves, and shares after the first week so the next post repeats what worked.
Creators who post every week can keep that note in one file and stop rereading the steps. We turn one long video into shorts, clips with captions, thumbnails, and platform-ready posts, then schedule them to YouTube, X, Instagram, Facebook, TikTok, and LinkedIn, which is the practical way to repeat a clean master instead of rebuilding the queue by hand.
Taja AI turns one long video into shorts, captioned clips, thumbnails, and platform-ready posts, then schedules them across YouTube, Instagram, TikTok, and the rest of your channels. That is the same clean-master workflow this guide recommends, without exporting each Reel by hand. Visit Taja AI to put the next video on that path.


We are blessed to work with leading brands & Companies


We try to make easy and simple for every professionals. Get 30 days free trial - No credit card required.


© 2025 Taja AI. All rights reserved.