.jpeg)
How to Transcribe Zoom Recording Fast and Accurately
Learn how to transcribe Zoom recording with built-in tools, export options and AI services. Get accurate transcripts and repurpose them faster.
5 min read
September 18, 2026

Learn how to do auto captions on Instagram for Reels, Stories and feed videos — enable, edit, fix errors and make captions readable every time.
Written by:


You post a Reel, the hook is solid, the framing is clean, and the audio says exactly what your audience needs to hear. Then the first viewers see it on mute in line at a coffee shop, at work, or late at night with sound off. If your caption layer is missing, wrong, or buried under Instagram's buttons, that Reel loses people before the message even lands.
That's why learning how to do auto captions on Instagram isn't a cosmetic editing trick. It's part publishing hygiene, part accessibility, and part retention strategy. Instagram gradually built captioning into Stories, Reels, and feed videos, starting with Stories in May 2021 and expanding later, while still leaving uneven support across surfaces and no true caption-file workflow in the app itself, as outlined in this Instagram auto captions rollout summary.
Most creators don't need another reminder to “add captions.” They need a workflow that works when they're posting often, repurposing long videos, and trying not to fix the same problems twice. That's what this guide is for.
A lot of Instagram video dies in silence.
On Reels and Stories, people scroll fast, autoplay starts muted, and your spoken opening has to compete with everything else on screen. If the first line isn't readable, viewers don't wait for context. They move. Captions are often the only reason the hook gets a second chance.
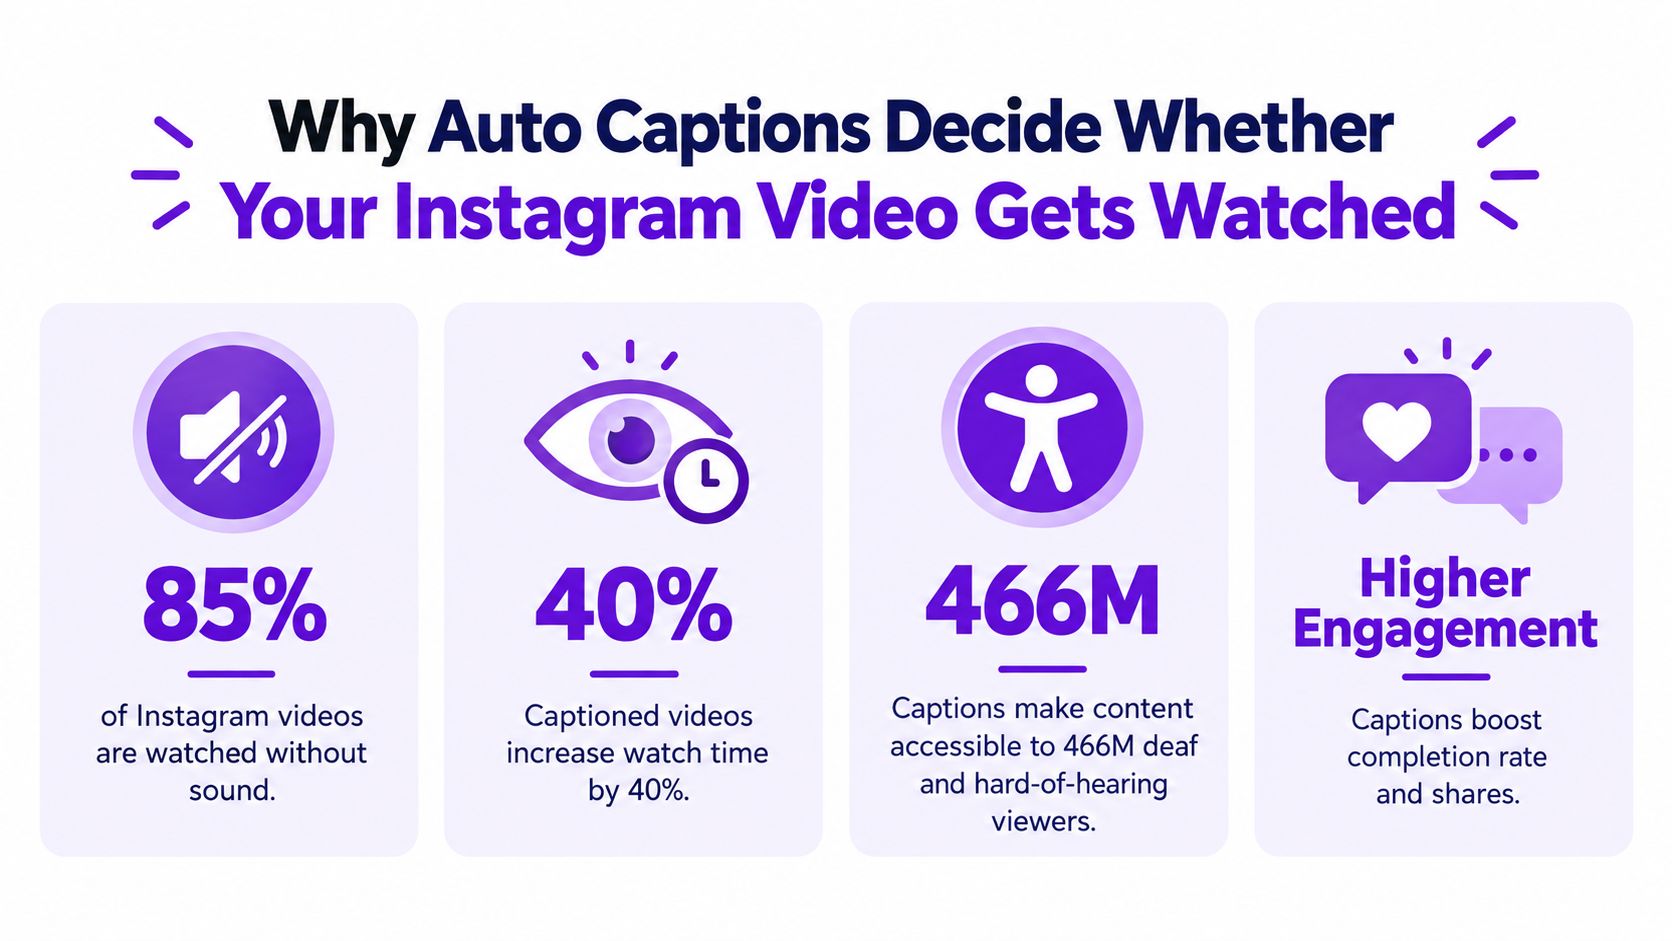
The behavior data backs up what creators see every day. One source reports that roughly 85% of social media video is viewed without sound, and another says 92% of U.S. mobile customers watch video with the sound off. The same source also says viewers are 80% more likely to watch a video to completion when captions are present, while captioned social videos can see 38% higher engagement and 31% longer retention than uncaptioned ones, according to the cited study summary here.
Once you've posted enough short-form video, this becomes obvious. The job of captions isn't only to transcribe speech. They help your Reel communicate before the viewer commits audio attention.
That matters even more if your content opens with any of these:
Practical rule: If the first three seconds don't work on mute, the Reel usually doesn't work.
Creators who publish often run into this early. They don't need a bigger camera setup. They need cleaner packaging. If you're trying to improve short-form results, a resource like this DMpro growth video guide is useful because it focuses on the execution side of video content, not just abstract platform advice.
Instagram's rollout mattered because it moved captioning from manual labor to a built-in speech-to-text step. That didn't solve everything, but it changed the default expectation. You can now create a Reel and generate captions inside the app instead of typing every line by hand.
The catch is that “auto captions” still need editing, placement, and quality control. If you want a broader primer on caption formats and use cases before getting into Instagram-specific quirks, this guide on adding captions to video content is a solid companion read.
You open Instagram on your phone, add a Reel, and see a captions tool. Later you post a Story from another account and the option looks different, or it is missing entirely. That is normal on Instagram.
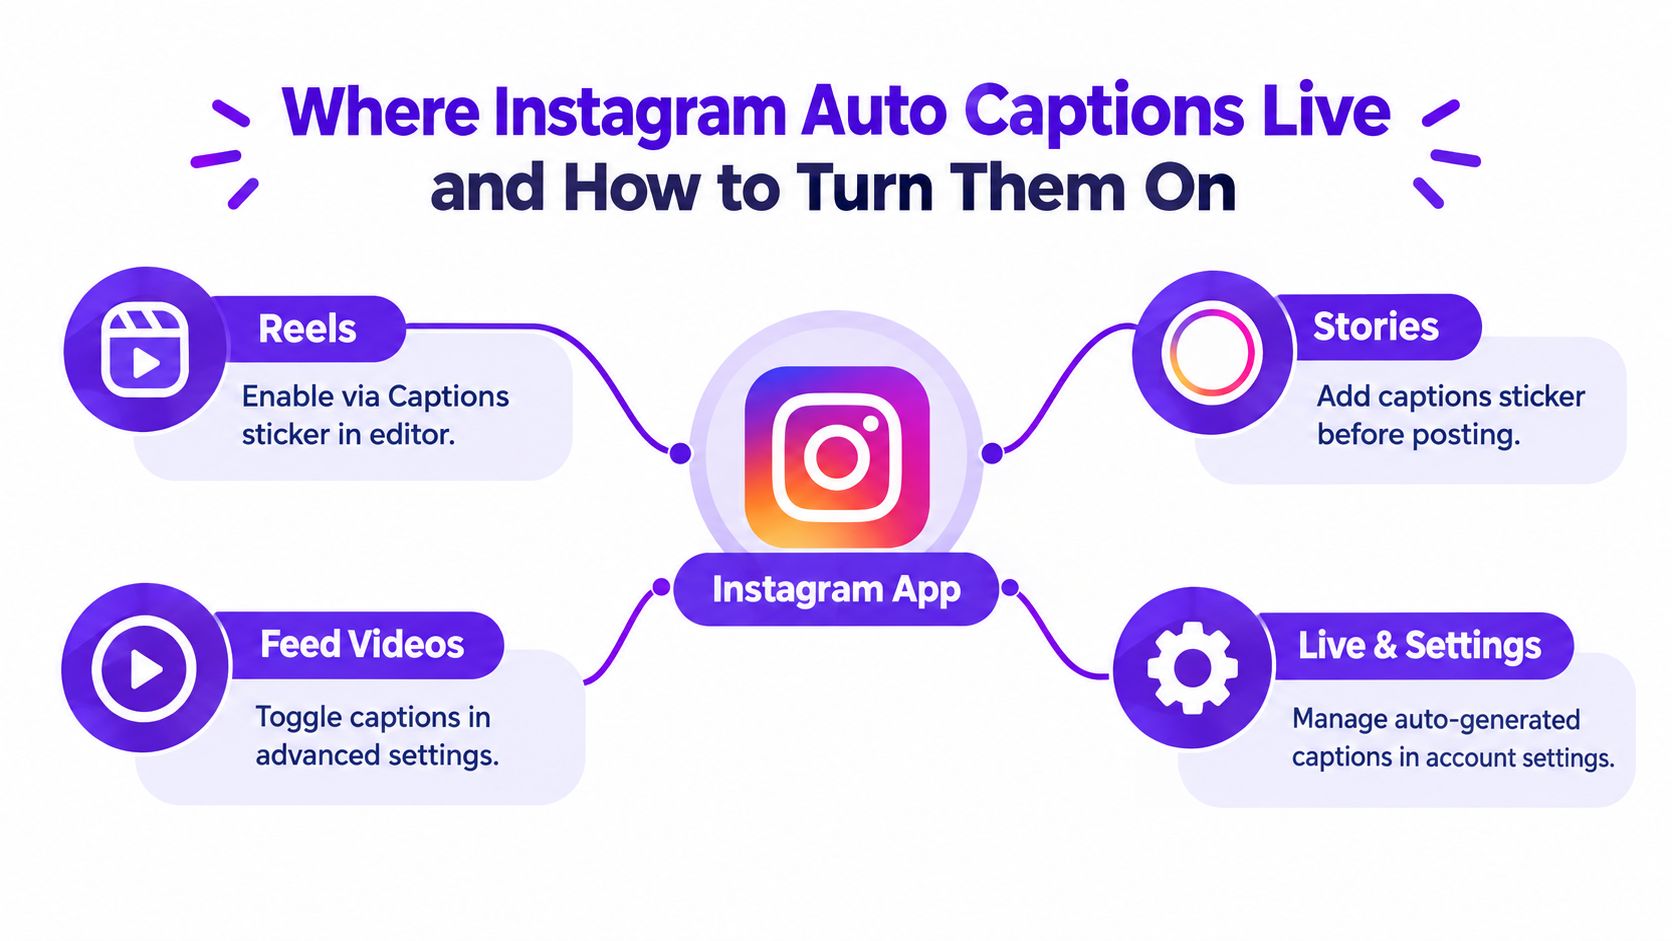
Instagram does not treat auto captions as one clean feature with one master switch. It treats them more like a patchwork accessibility layer spread across different publishing surfaces. Reels, Stories, feed video, and Live do not expose the same controls, and desktop still is not the right place to set this up. If you post often, that fragmentation is the time drain.
For native Instagram captions, the mobile app is the main workspace. Accessibility guidance from RNID notes that caption availability and behavior can differ by device and interface, and that desktop does not offer the same experience as mobile in practice, as explained in this RNID Instagram captions guide.
That detail matters more than it sounds.
A lot of captioning problems are really setup problems. Creators check the browser version, do not see the same tools, then assume the feature is gone or broken. Start on the phone first and you eliminate half the confusion.
Instagram's own behavior makes more sense once you stop expecting parity across formats. Reels usually give you the clearest built-in caption workflow. Stories can support captions, but the controls are tied to Story creation. Feed video behavior can vary based on the posting flow you are in. Live is its own case and should not be treated like a Reel with a different thumbnail.
Use this as the practical map:
| Surface | Where you usually control captions | What to expect |
|---|---|---|
| Reels | In the Reel editor via the Captions option or sticker | The most reliable native option for short-form posting |
| Stories | In Story creation before posting | Available, but placement and legibility need checking |
| Feed videos | In advanced settings or the video post flow | Interface can vary by account and device |
| Live | Separate caption behavior from other formats | Do not expect the same tools or setup as Reels |
That split is why reusable workflows matter. Instagram can generate text in one surface, then give you fewer controls in another. If you repurpose the same clip into multiple formats each week, relying on native captions alone gets messy fast.
Before posting, check the account-level accessibility settings in the app and make sure subtitles are enabled if that option is available on your device. Then confirm you are creating the video in the surface where you expect the captions to appear. Those are two separate checks, and creators often skip one.
A quick setup pass saves rework later:
One more practical point. Instagram auto captions help, but they are still a partial accessibility layer, not a full caption management system. There is no simple caption-file upload workflow across all surfaces, which is why many creators end up burning in captions for reliability or using a repurposing tool to keep styling consistent before they publish inside Instagram.
The native Reel workflow is straightforward. The sloppy part usually happens after transcription, when creators accept whatever Instagram generated and hit publish.
That's where names break, numbers get mangled, jargon turns into nonsense, and the caption block lands under Instagram's interface. The fix is simple, but you have to build it into your posting habit.
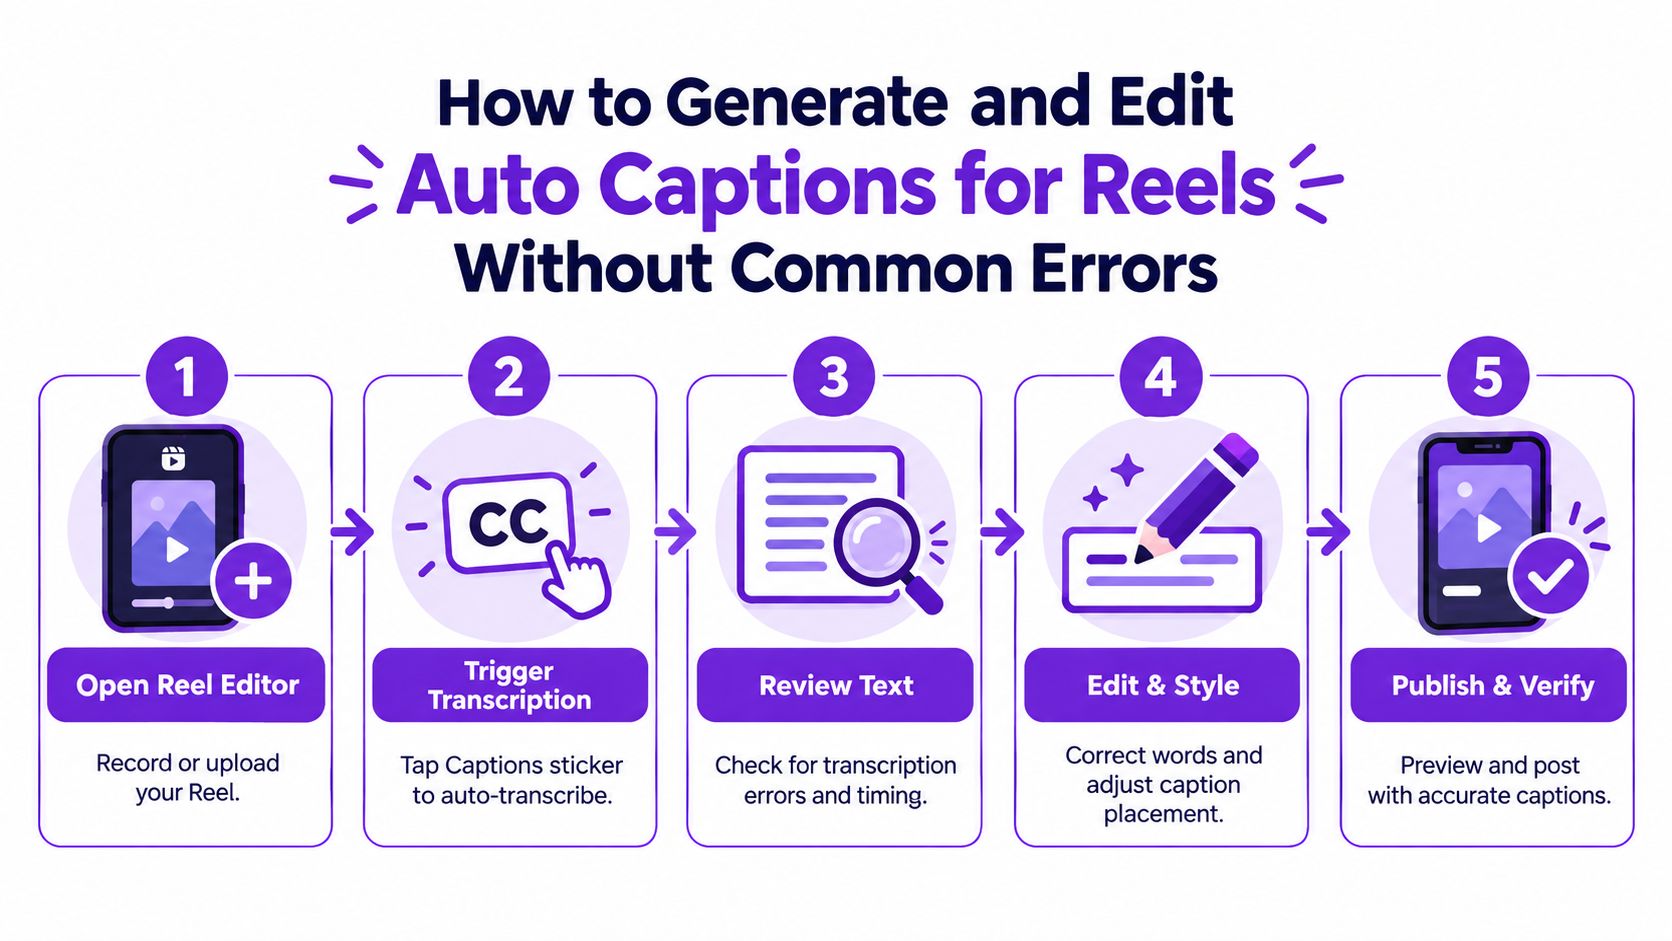
Instagram's built-in process for Reels works like this: open the Reel editor, upload or record your video, tap the sticker tray or Captions option, let Instagram transcribe the audio, then review and edit before posting. Practical guides stress that the review pass matters because speech recognition often misses names, technical terms, numbers, dialects, and overlapping speech, as described in this Instagram captions how-to.
That basic workflow is easy enough that the average person can learn it in one attempt. The quality gap comes from what you do next.
Don't review captions like a copy editor reading a paragraph. Review them like a distracted stranger hearing half the sentence in a noisy feed.
Here's the fast pass I'd use on every Reel:
Don't ask whether the captions are “mostly right.” Ask whether a first-time viewer can trust them.
For many creators, this takes less than a minute once you've done it a few times.
A visual walkthrough can help if you want to see the in-app flow before you test it yourself:
Placement is the mistake that makes a decent caption job look amateur. Instagram's bottom controls and overlays can cover text that looked fine in the editor.
Move the caption block upward into the safe area before posting. Also check that it isn't covering your face, product demo, or on-screen proof.
A quick placement table helps:
| Placement issue | What happens | Better move |
|---|---|---|
| Too low | Instagram UI covers text | Raise captions above bottom controls |
| Dead center | Text blocks key visuals | Shift slightly higher or lower based on subject |
| Too small | Fast scrollers skip it | Use readable sizing over styling flair |
| Low contrast | Words disappear into footage | Change style or use a different workflow |
If you need more stylized subtitle designs than Instagram offers, some creators use external tools first, then upload a finished video. For example, AI-powered custom caps by FLYP are relevant when you want more control over the visual treatment before the Reel reaches Instagram.
If you're repurposing longer videos into clips, a tool focused on caption generation for videos can also help you get the transcript right before you enter Instagram's editor. That's often easier than fixing the same wording repeatedly inside each platform.
You turned captions on. They generated. You posted.
That still doesn't mean viewers got a clean experience.
Instagram's biggest caption problem isn't only transcription accuracy. It's reliability across surfaces and the lack of professional caption controls. The platform still doesn't support uploading caption files for video content, so creators are stuck with auto-generated captions they can toggle and edit, but not import and manage like a standard caption pipeline. Accessibility guidance also frames auto-generated captions as support for people who are deaf, hard of hearing, or prefer text, while users have also criticized presentation changes such as the removal of the grey background behind auto captions, which can make text harder to read against video footage, according to this accessibility analysis of Instagram caption limits.
The practical issues tend to cluster in three places.
Auto captions can be technically present but visually weak. If the footage is bright, busy, or fast-cut, thin text without strong separation can disappear.
What works better:
A Reel can look fine on your phone and behave differently for another viewer depending on app version, device, or surface. That's frustrating, but it's normal with Instagram captioning.
What helps:
If a post must be readable in every context, native captions alone are a gamble.
The missing caption-file upload option creates a bottleneck. You can't build one polished caption asset and attach it the way many editors expect.
That's why teams publishing at volume often split their workflow in two:
| Need | Native Instagram captions | External burned-in captions |
|---|---|---|
| Fast in-app posting | Good fit | Slower |
| Precise design control | Limited | Better |
| Reusable caption asset | Weak | Better |
| Cross-platform consistency | Weak | Better |
If you're exploring broader production options for short-form editing, this roundup of AI video tools for Reels is useful because it looks at workflows beyond Instagram's native editor.
Use native auto captions when speed matters and the Reel is simple. Use external burned-in captions when brand consistency, contrast, or reuse matters more than in-app convenience.
That one decision saves more time than most micro-optimizations.
Good captions do two jobs at once. They make the video easier to follow for people who are deaf, hard of hearing, or watching without sound, and they reduce editing friction when you need to publish across multiple platforms.
Most creators treat those as separate problems. They're not. The same disciplined workflow solves both.
A readable caption layer is not the same as a word-for-word dump of audio. Native auto captions can get you close, but the useful version is the one a viewer can process quickly.
Use a simple standard:
Clean captions respect the viewer's attention. Messy captions spend it.
If you publish often, typing captions from scratch inside every app is where time disappears. A better system is to generate or refine your transcript once, then use that transcript as the base asset for every cutdown.
That's especially useful for:
In that kind of workflow, one option is Taja AI, which is built for repurposing long-form video into short assets and platform-ready posts. In practice, that means you can create from one source instead of rebuilding the same caption logic for each clip. If you're thinking about the broader editing system around that process, this guide to social video editing workflows is useful.
This is the routine that keeps captioning manageable without turning it into a full-time job:
A short internal checklist helps teams stay consistent:
| Checkpoint | What to confirm |
|---|---|
| Accuracy | Names, terms, and numbers match the spoken content |
| Readability | Text is legible against the footage |
| Placement | Nothing important is hidden by captions or UI |
| Reuse | Transcript can support clips on other platforms |
| Brand safety | Styling and wording match how you publish publicly |
The goal isn't perfection. It's a repeatable standard that keeps every video watchable on mute and easy to repurpose later.
The cleanest way to handle Instagram captions is to stop treating them like a last-minute sticker.
Treat them like part of the asset. Turn the feature on, generate the draft, edit every Reel, move the text into the safe area, and decide early whether native captions are enough or whether the clip needs burned-in subtitles for better control. That habit solves more watchability problems than chasing minor posting hacks.
If you post occasionally, keep it simple. Use Instagram's built-in captions, fix the opening lines, verify names and numbers, and preview placement before you publish.
If you post every week, build a system. Clean transcripts once, repurpose from the source, and only rely on Instagram for the final polish where it makes sense.
The key point is this. How to do auto captions on Instagram is no longer just about finding the button. It's about dealing with a fragmented caption layer, knowing where native tools help, and avoiding the spots where they waste your time.
Publish your next Reel with captions that were reviewed. That one change makes your video easier to follow, easier to trust, and far more usable in the way people really watch Instagram.
If you're repurposing longer videos into Instagram clips, Taja AI helps you turn one source video into short-form assets, captions, and platform-ready posts without rebuilding everything by hand each time. It's a practical fit when you want a cleaner caption workflow before your content ever reaches the Instagram editor.


We are blessed to work with leading brands & Companies


We try to make easy and simple for every professionals. Get 30 days free trial - No credit card required.


© 2025 Taja AI. All rights reserved.