.jpeg)
Short Form Video Creation: The Complete Step-by-Step Guide
Master short form video creation with actionable steps for scripting, shooting, editing, and distributing high-performing clips. Build your system in 2026.
5 min read
October 6, 2026

Master Facebook video upload in 2026 with this step-by-step guide covering formats, resolutions, privacy, captions, and troubleshooting tips.
Written by:


You've finished the edit. The export reaches 100 percent, the caption is polished, and the thumbnail looks sharp in your editor. Then the Facebook upload crawls, the preview turns soft, the audio slips out of sync, or the platform rejects the file without explaining why.
Most Facebook video upload failures happen before Facebook ever sees the file. The export uses an awkward codec, the frame fits the wrong destination, or the audience setting restricts who can watch it. This guide treats uploading as a publishing decision, not a file-transfer task, so you can choose the right master, surface, captions, privacy settings, and troubleshooting path before you click Publish.
A local agent uploads a clean horizontal property tour, then sees Facebook crop the rooms until the kitchen disappears. A podcast host sends a vertical clip for a Reel and finds the guest's name hidden beneath interface controls. An educator posts a lecture with clear audio, only to watch viewers leave when the first processed version looks blurry and the captions misread the subject.
The source file may be fine. Facebook re-encodes uploaded videos into multiple playback versions for different devices and network conditions, so viewers may not receive the exact master file you selected. Its engineering documentation describes server-side processing that produces different encodings and bitrates for varied playback environments. That makes the quality of your source, export settings, and chosen destination work together. Facebook's video encoding overview explains why a completed upload can still produce a weak final post.
Practical rule: Judge quality after Facebook finishes processing, and check playback on the device your audience actually uses.
Three breakpoints cause most avoidable failures:
Set the publishing choice before you export. Use vertical framing when the subject and action belong in Reels or Stories. Choose widescreen for wide demonstrations, property tours, and scenes where side-to-side context matters. Use square when a balanced Feed presentation matters more than full-screen viewing.
A dependable workflow uses a progressive MP4 master, accurate captions, and a deliberate upload path from desktop or mobile. Review the crop, audio, captions, and audience settings after processing. The progress bar confirms transfer only. It does not confirm that the finished post looks or sounds right.
Desktop is the better choice when you have a finished master, a carefully written description, an SRT caption file, or several audience settings to review. It gives you more room to inspect the composer instead of rushing through the mobile publishing flow.
From the Facebook home feed, choose Photo/Video. If you're working from a Page, open the Page's creation area and select the video publishing option. Pick the destination before you finalize the post. Depending on the account and interface, Facebook may offer Feed, Reel, Story, or a general video composer.
That choice affects how the video is presented. Don't send a horizontal master into a vertical-first composer and hope Facebook will make the crop intelligent. It won't know that a person's face, a product label, or the key detail in a property tour matters more than the edges.
After selecting the file, review each control deliberately:
A personal profile, Page, and Group can expose different composer controls and audience behavior. A profile post usually centers on the account holder's selected audience. A Page post is a public-facing business publication unless restrictions change it. A Group upload follows the Group's membership and moderation context.
Facebook may let viewers watch a lower-quality rendition while processing continues. Don't judge the final result from the first soft preview. Wait for processing to finish, then test the published post on a desktop browser and a mobile device.
The mobile app is faster when the footage is already on your phone and the post needs light editing. Start from the home tab, tap the plus button, and choose Reel, Story, or Post before selecting footage. Setting the destination first helps the app show the correct crop and editing tools.
You can choose a clip from the camera roll or record inside Facebook. After selection, use the trim tool to remove dead space at the beginning and end. Check the original-audio control carefully, especially when you're reusing footage with licensed music. Muting the original track can remove dialogue, while leaving it enabled can create an unwanted mix with music added in the app.
Mobile offers useful visual checks that desktop often hides behind menus:
The tradeoff is control. Mobile accounts often provide fewer caption-editing options, and most mobile upload flows don't offer the same SRT sidecar workflow available through desktop editing tools. Long descriptions can also be truncated in feed previews, so place the essential point at the start.
Review the audience, cross-posting, and destination toggles before tapping Publish. Scheduling and cross-posting options can differ between the mobile app and Meta Business Suite on the web. If the post supports a campaign or recurring series, use the web workflow when you need a predictable queue and more detailed review.
Treat the upload as a publishing decision, not a file-transfer task. Start with a progressive MP4 using H.264 or H.265 video, square pixels, 4:2:0 chroma subsampling, and a closed GOP of roughly 2 to 5 seconds. Pair it with stereo AAC-LC audio at 44.1 or 48 kHz and at least 128 kbps. Facebook's video upload requirements support these settings for Reels and related video uploads.
Because Facebook creates its playback renditions from the file you send, a clean 1080p master gives its re-encoder useful detail without making you upload an unnecessarily heavy 4K file. That makes 1080p the practical default for Feed, Reels, and Stories when the original footage supports it. Use a constant frame rate between 24 and 60 fps, progressive scanning, and audio and video that begin at timestamp zero.
Facebook re-encodes each upload into adaptive-bitrate versions such as 360p, 480p, 720p, and 1080p. Playback conditions determine which version a viewer receives, and quality can change during the same viewing session. Upload the strongest finished file you have, then check the published video on both Wi-Fi and a mobile network.
Variable-frame-rate recordings frequently cause audio drift. Screen recordings and phone footage often use this timing mode, so a file may look correct in your editor yet lose sync after Facebook processes it. Convert the timeline to a constant frame rate before exporting. Repairing drift after publication is slower and less reliable.
For live workflows, Meta documents a video bitrate range of 4,500 to 9,000 Kbps. Sending more data than the connection can handle can increase interruptions, while sending too little produces visible compression. This range applies to live transmission, not to every uploaded video file.
A polished edit can still fail if the file has variable timing, an unusual pixel format, interlaced scanning, or an unsupported audio stream.
Run a media probe before uploading. Confirm the container, codecs, dimensions, frame-rate mode, scan type, audio format, and starting timestamps. Then upload the verified master, wait for processing, and inspect playback at low, medium, and high quality. A file that passes those checks is ready for Facebook's processing pipeline, not merely ready to leave your computer.
The right orientation depends on what the viewer needs to do. Reels and Stories usually benefit from a 9:16 vertical cut because the video fills a phone screen. Feed is more flexible, and horizontal or square remains the smarter choice when the frame contains several people, a presentation slide, a property interior, or a demonstration that depends on horizontal context.
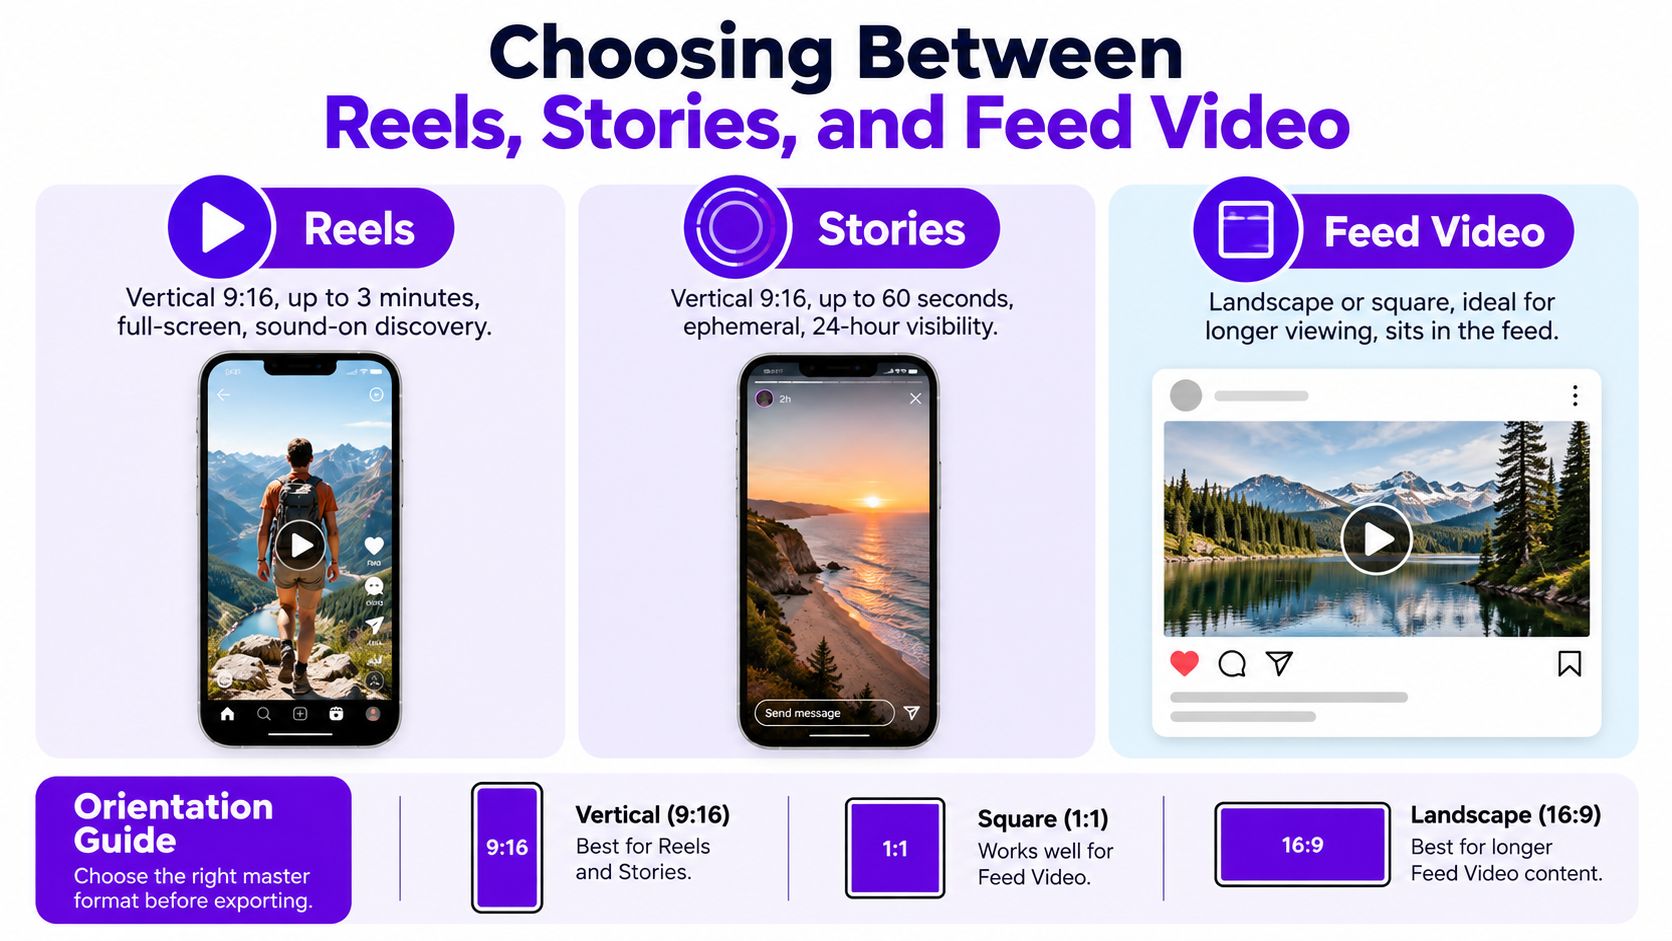
Use this decision rule:
A vertical crop isn't automatically better. It works well for one speaker, a close product demonstration, or a visually simple sequence. It can damage an interview with two people, a wide room, a real-estate tour, or a presentation where the edges contain essential information.
Square video is a useful middle ground for Feed. It occupies more mobile screen area than a traditional horizontal frame without forcing every subject into a narrow vertical crop. Don't place a square export inside a vertical Reel canvas with large empty bands. That makes the video look repurposed instead of intentionally designed.
Keep essential text, faces, and logos in the central safe area of a vertical composition. Interface elements can cover the top, bottom, or side edges, and captions burned into those regions become difficult to read or disappear entirely.
For a practical walkthrough of the publishing flow, use this guide to post Reels on Facebook.
The best workflow is usually one strong horizontal or square master plus a separately edited vertical cut. Don't let the platform decide where to crop the important information.
The audience selector deserves the same attention as the export settings. A technically perfect Facebook video upload can still underperform when it reaches the wrong people, or fail its purpose entirely when the post is hidden.
On a personal profile, the audience selector can offer choices such as Public, Friends, Friends except Acquaintances, Specific Friends, and Only Me. These options control who can view the post from that profile. They don't change the underlying video quality, and they don't turn a private post into a Page publication.
Review the selector every time you publish. Facebook can retain a previous audience choice as the default for future uploads, so a creator who shared a family clip with Friends may accidentally restrict a business announcement. The reverse mistake is worse when a personal video goes Public because the account holder assumed the Page settings applied.
Pages operate differently. A Page video is generally intended for public distribution, but Page publishers may also use an unpublished post for testing or campaign work. Audience restrictions can narrow distribution by factors such as age, country, or language where those controls are available. Branded-content disclosures, tagging, and feed-distribution controls also change how the post appears and who can encounter it.

Groups add another layer. The Group's membership, approval process, and rules influence visibility, so a video uploaded there shouldn't be treated like a public Page asset.
Changing the audience after publication may not restore the distribution you wanted. If a post went to the wrong audience, your practical choices may involve editing the settings where available, unpublishing a Page post, or creating a corrected publication. Reels don't support every profile privacy option, including an Only Me workflow.
Turn on auto-captions when you need a fast draft, but don't treat the generated text as final. Automatic transcription commonly struggles with brand names, technical vocabulary, accented speech, overlapping speakers, and names that aren't common in its language model.
For important videos, export a clean SubRip .srt file from Premiere Pro, DaVinci Resolve, or CapCut. Facebook documents SRT caption support in its caption upload instructions. On desktop, open the video editing controls, choose Captions, and attach the sidecar file. Check the language or locale selection before saving it.
Keep captions synchronized with the final export. If you trim the video after creating the SRT, every later cue can drift. Fix timing in the editor, then attach the revised file rather than manually chasing errors inside Facebook.
Burned-in captions still have a place for stylized short-form content, but they shouldn't replace an accessible caption track. Hard-coded text can be cropped, covered by interface controls, or duplicated when Facebook displays its own captions. It also prevents viewers from controlling caption appearance.
Before publishing, run this check:
For more context on Facebook sharing and distribution choices, see how to share videos on Facebook.
Stop blaming the upload button first. Most failures originate in the editor, the recording device, or the publishing choice.
| Problem | Likely Cause | Fix |
|---|---|---|
| Upload remains stuck on processing | Heavy source file, incompatible codec, variable timing, or an interrupted queue | Re-export a progressive MP4 with H.264 video, AAC audio, constant frame rate, and complete metadata |
| Playback looks blurry | Facebook selected a lower rendition, or the master lacks enough detail for re-encoding | Preserve a clean 1080p source, avoid repeated transcodes, and test the processed post on different connections |
| Audio drifts from video | Variable-frame-rate screen recording or phone footage | Convert the timeline to constant frame rate, then export again |
| Facebook rejects the file | Unsupported codec, unusual audio stream, damaged container, or an account-specific limit | Inspect the media properties, re-mux or re-export, and upload the corrected master |
| Video looks wrong in Reels | Landscape or square source forced into a vertical presentation | Create a deliberate 9:16 cut with safe zones instead of relying on an automatic crop |
| Captions contain obvious errors | Auto-caption draft was published without review | Edit the transcript or attach a verified SRT file |
First, open the export in a local player and inspect the file with a media probe. Confirm that the audio plays, the video starts at the beginning, the frame rate is constant, and the container reports the codecs you intended.
If the file is questionable, use HandBrake to create a fresh MP4 with H.264 video, AAC audio, progressive scanning, and constant frame rate. Don't keep uploading the same broken export and hope Facebook's server will repair it. A clean re-export is faster than guessing.
When processing stalls, clear the browser cache, switch browsers, or try a different network. Those steps can reset a broken upload queue, but they won't fix an invalid file. If a verified export fails repeatedly, record the error message, the account type, the file properties, and the post identifier before contacting Meta Business Help.
A long-form master shouldn't produce one lonely post. Pull a focused vertical cut for discovery, a short update for Stories, and a context-rich Feed version. Write captions for each surface instead of copying a description that refers to a different crop or call to action.
Schedule the finished assets through Meta Business Suite or another publishing workflow. A long-form interview can become a sequence of topic clips, a quote-led Reel, a behind-the-scenes Story, and a full Feed post. Keep each version's audience and privacy settings aligned with its purpose.
You can also use Facebook auto-sharing workflows when cross-posting is appropriate, but inspect the destination after publication. Cross-posting saves setup time, not editorial judgment. Check the crop, captions, thumbnail, link treatment, and audience on Facebook rather than assuming the source platform's settings transferred perfectly.
A repeatable weekly rhythm might look like this:
The upload is the beginning of distribution. If you choose the master, destination, privacy setting, and caption workflow deliberately, Facebook's processing pipeline becomes a manageable part of publishing instead of a daily source of surprises.
Taja AI can turn a long-form recording into Facebook-ready clips, captions, thumbnails, and platform-specific posts, then schedule those assets alongside your other social channels. Visit Taja AI to upload one strong master and build a repeatable Facebook video publishing workflow.


We are blessed to work with leading brands & Companies


We try to make easy and simple for every professionals. Get 30 days free trial - No credit card required.


© 2025 Taja AI. All rights reserved.